Web management platform
一、Login
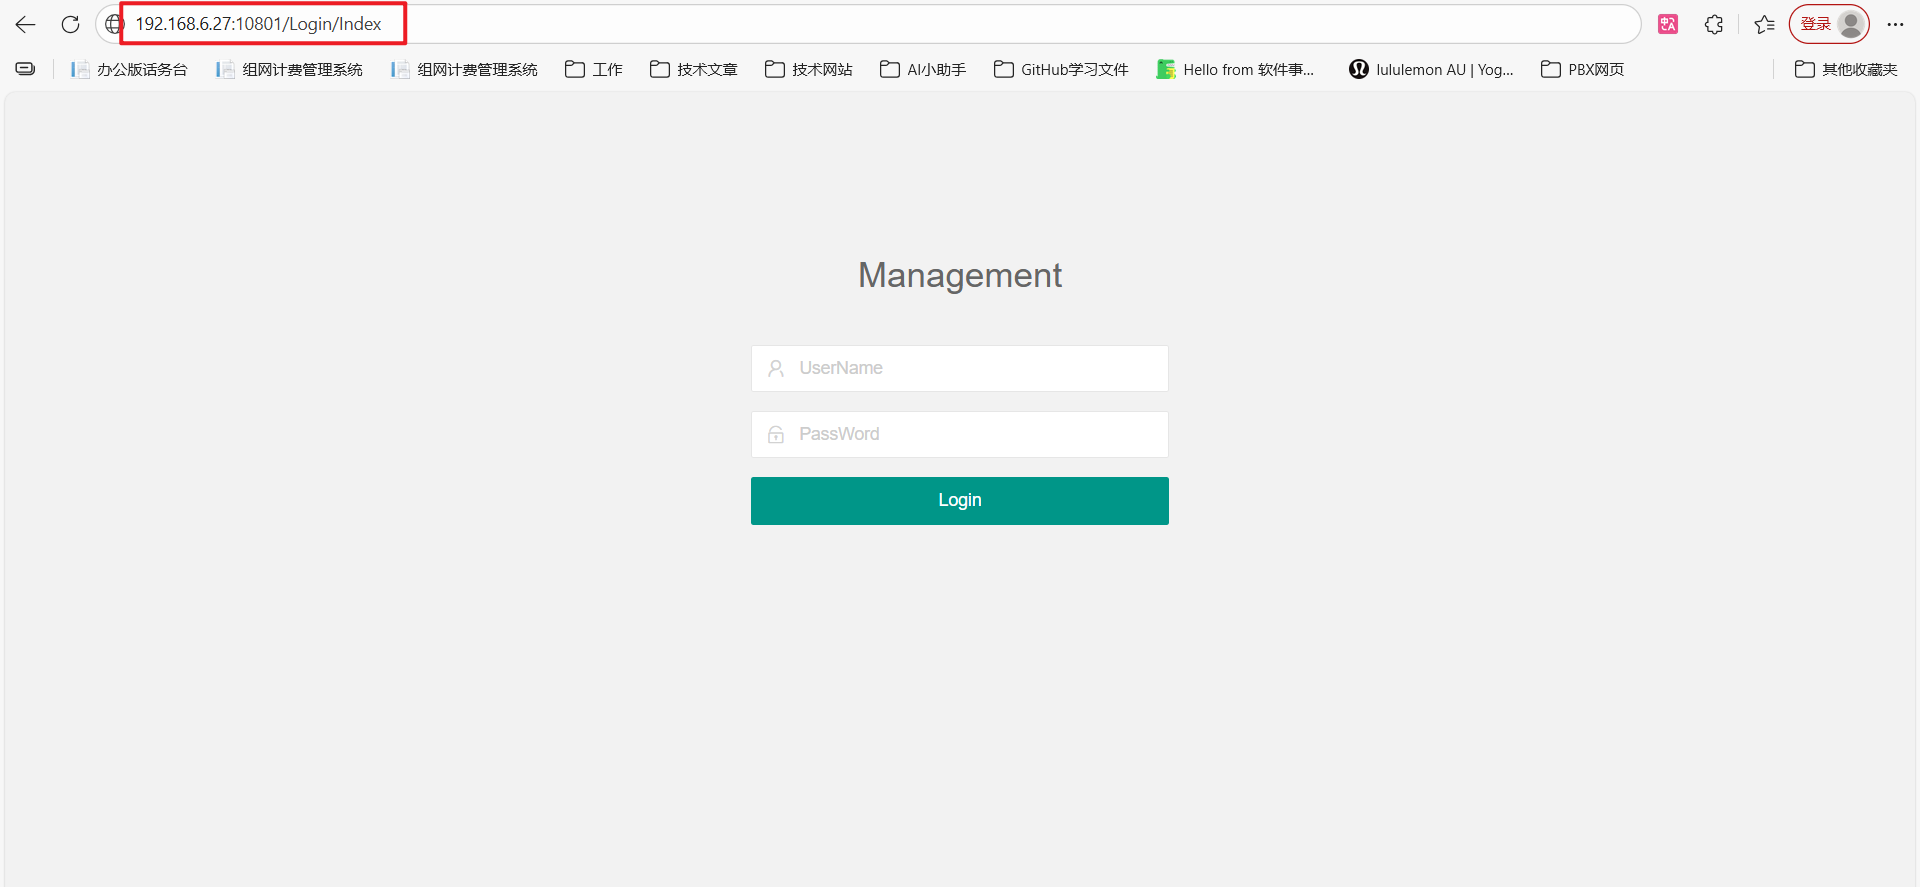
Open the "Switch Communication Management System WEB Management" page, which will automatically open the browser and enter the login interface
Username: admin
Password: 88888
Click "Login" to enter the WEB page
http://127.0.0.1:10801/Login/Index,This address is the address for accessing the billing server
In the same local area network, you can change the billing IP 127.0.0.1 to the IP address of the installed WEB server for access
For example:
http://192.168.6.27:10801/Login/Index
Username: admin
Password: 88888
If other administrators are set up on the server side, you can log in directly with the administrator account
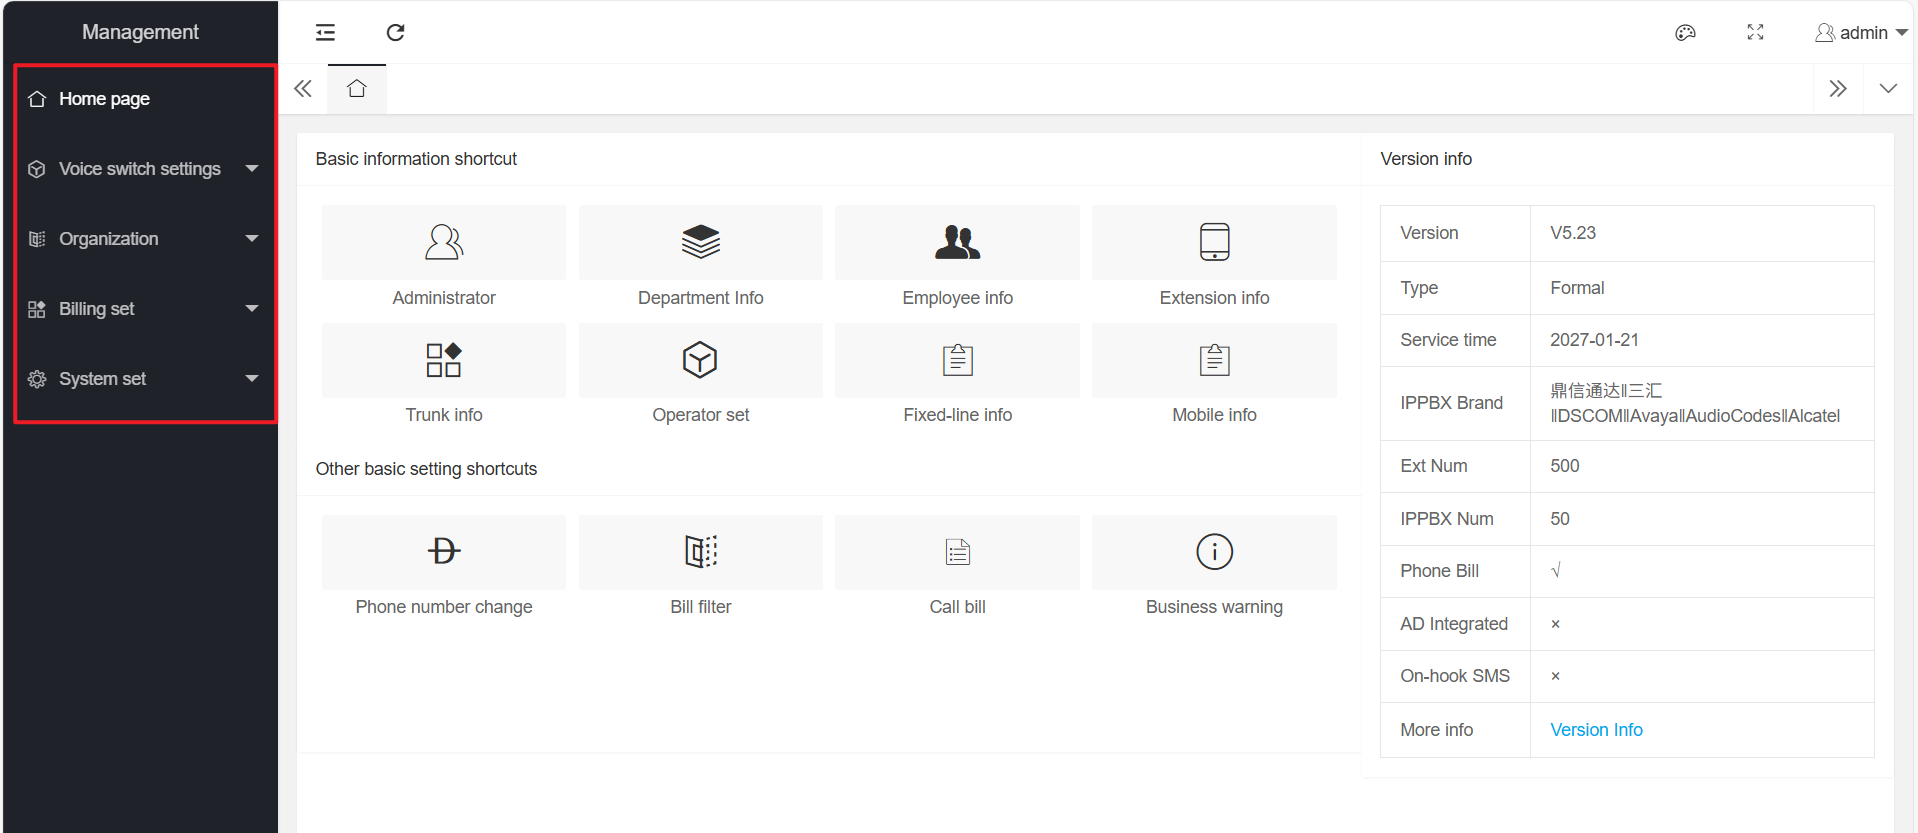
Upon entering the page, it is primarily divided into "Home," "Voice Switch Settings," "Organization Structure," "Billing Settings," and "System Settings."
Here is the screenshot:
二、HomePage
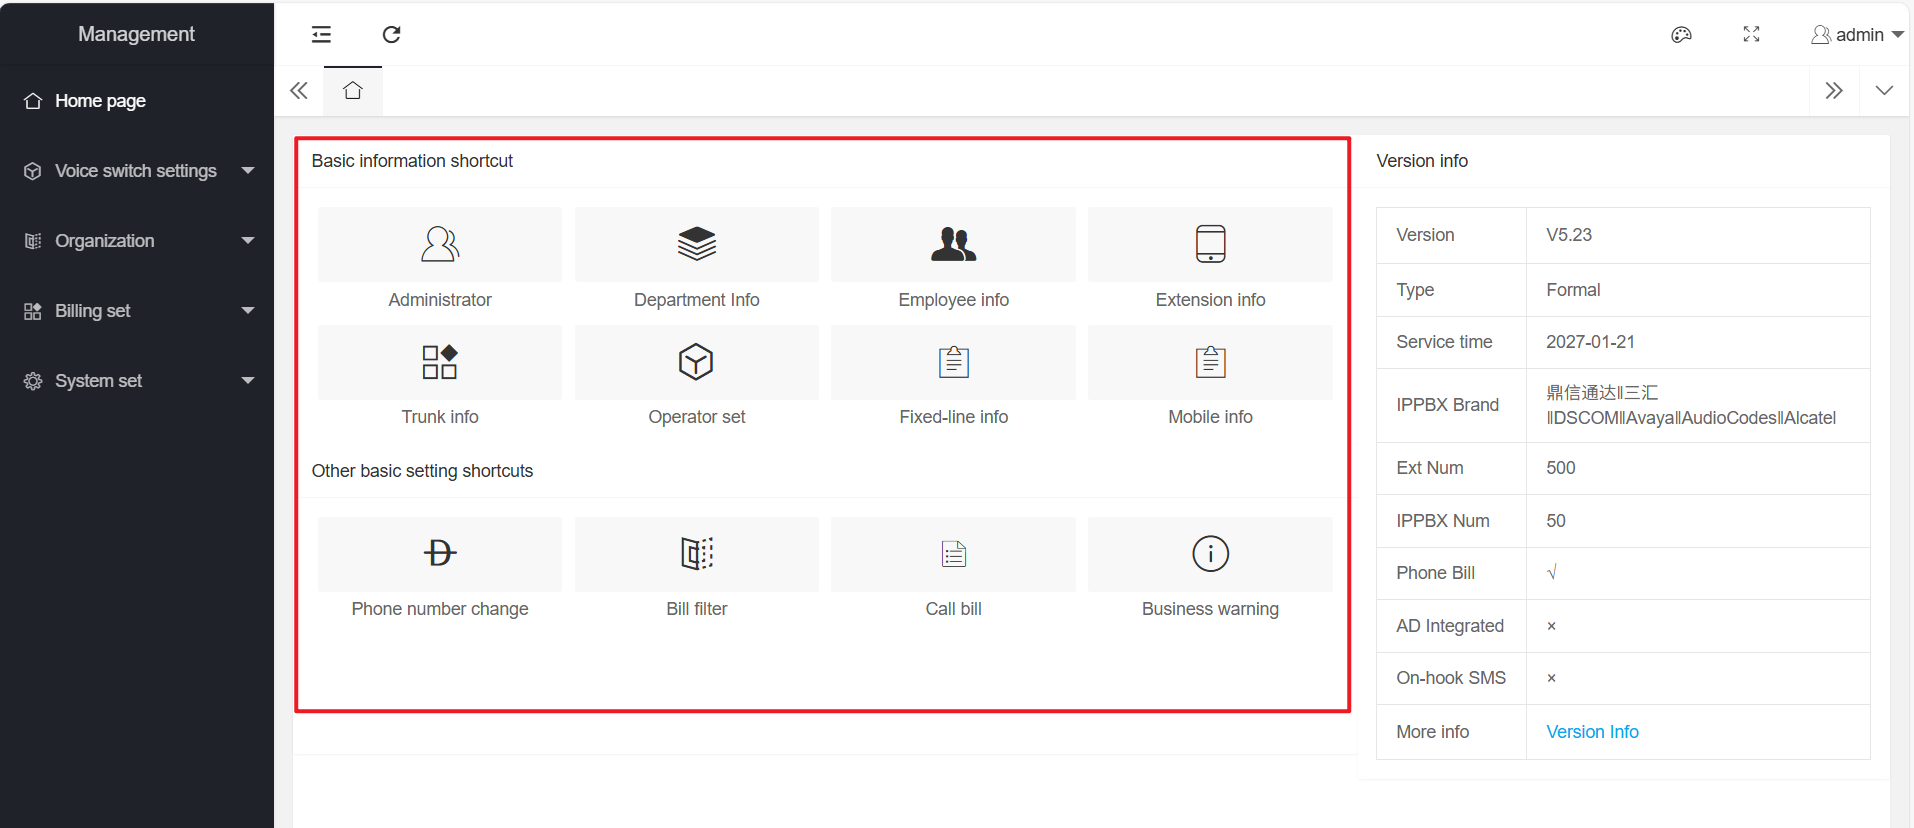
1、ShortCut
"Basic Information Shortcuts "and" Other Basic Settings Shortcuts "do not require searching in the navigation bar, and can be directly clicked to jump to the corresponding operation interface
As shown in the following figure:
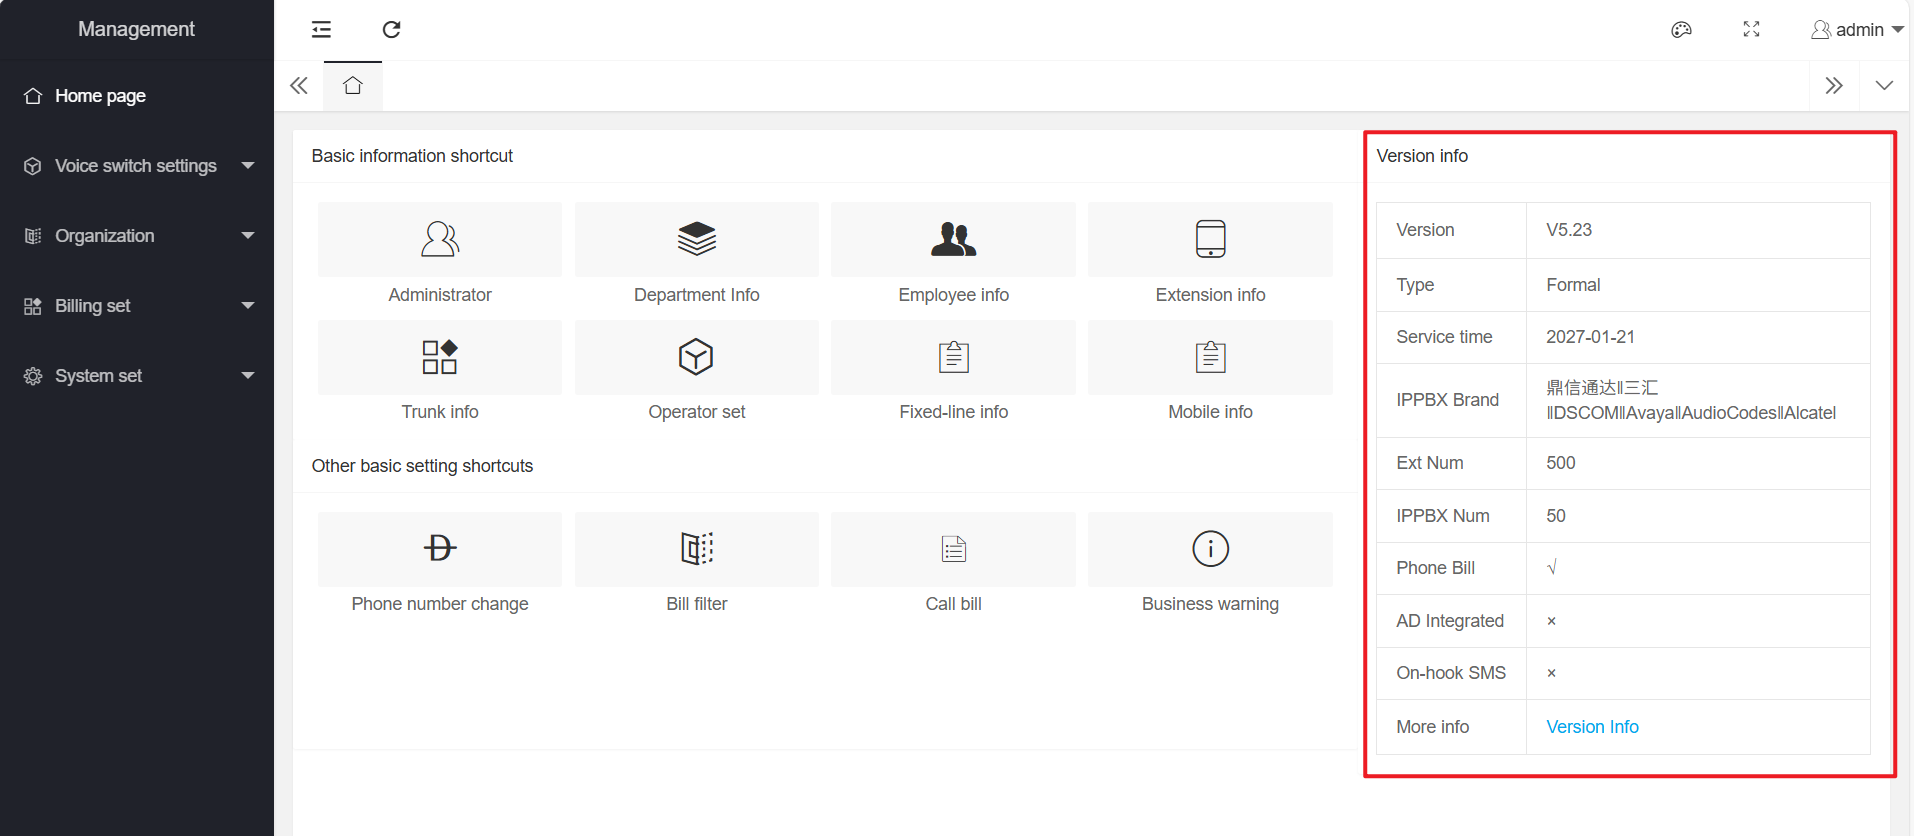
2、Version Information
You can view the version information involved in this interface, and you can also click to view more related information
Here is the screenshot:
三、organizational structure
The organizational structure mainly has the following functions (as shown in the following figure)
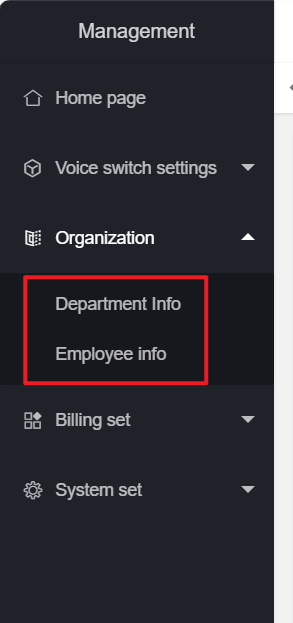
1、Department Information
Department information function introduction: Add, move, query, delete
(1)Add department
Right-click "Department Information" to add a department. After adding a department, you can continue to right-click the newly created department to create a sub-department.
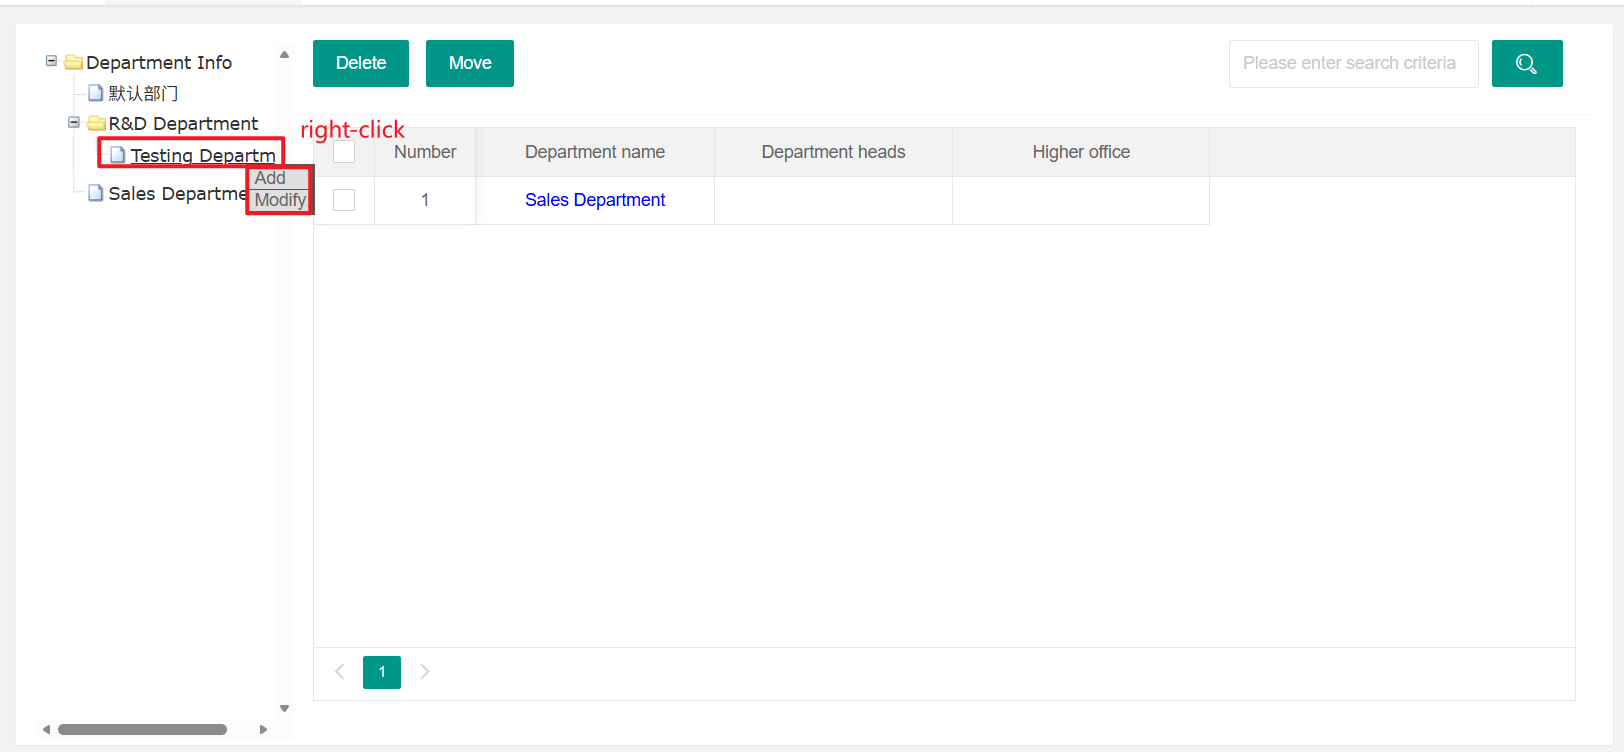
Fill in the information for the new department and click Save
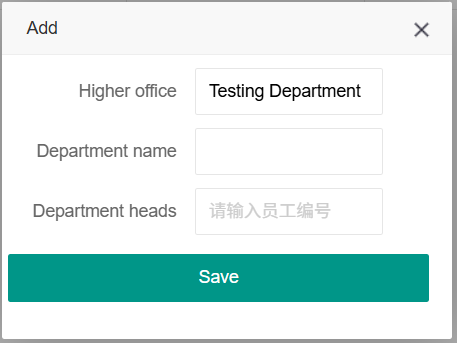
You can also modify the corresponding department information
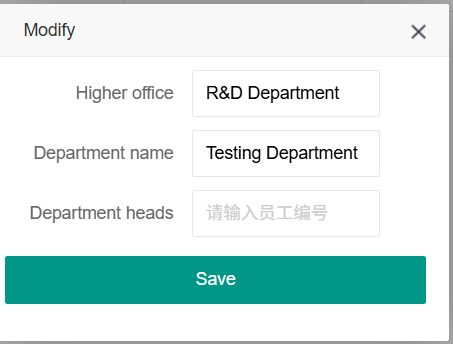
(2)Move department
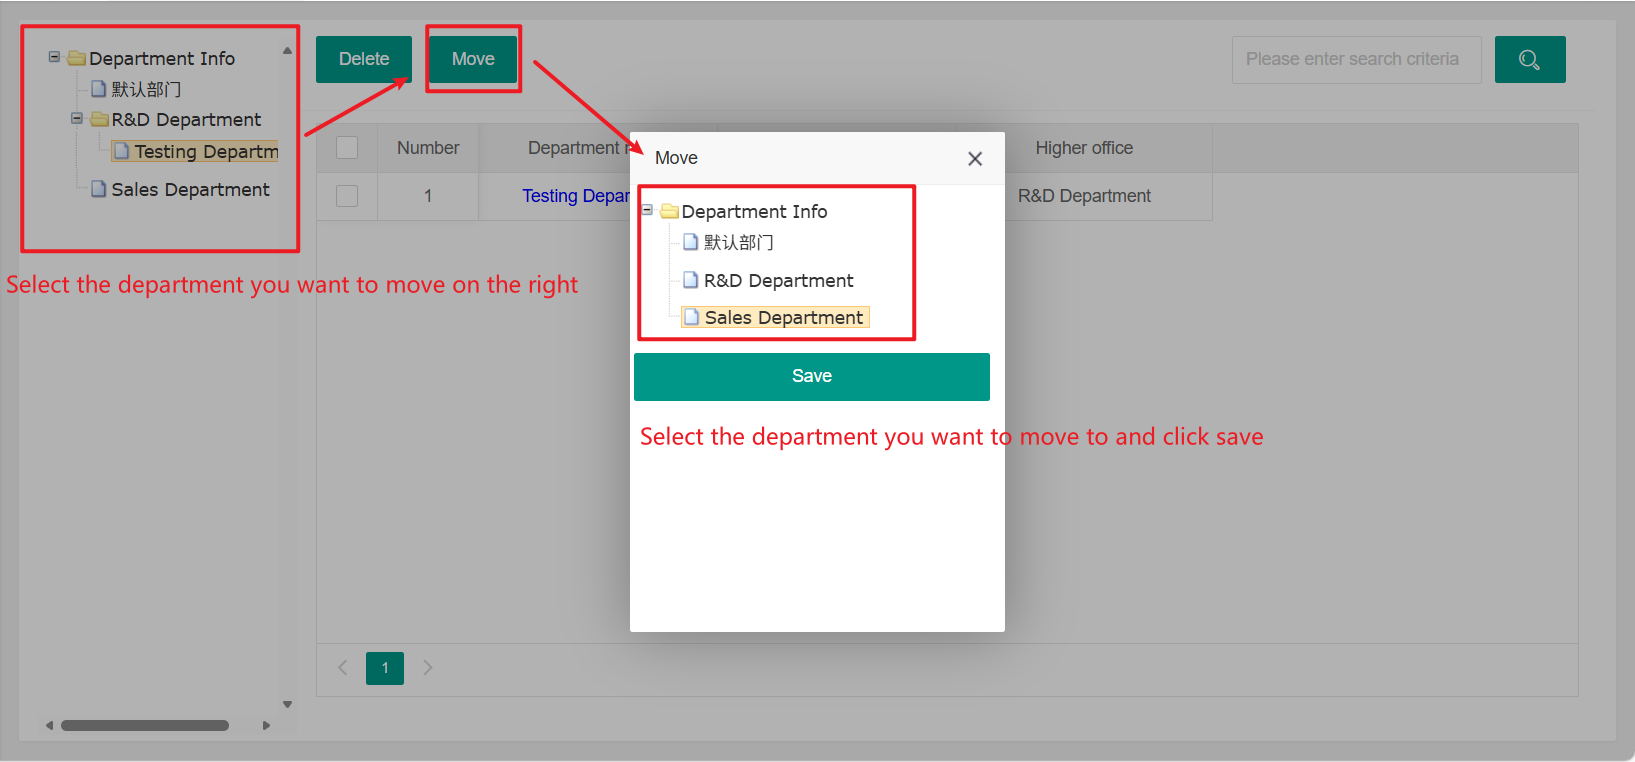
Note: Select the department you want to move on the left, and you can only move one department at a time
Click "Move", select the department to move to, and then click "Save"
(3)Search department
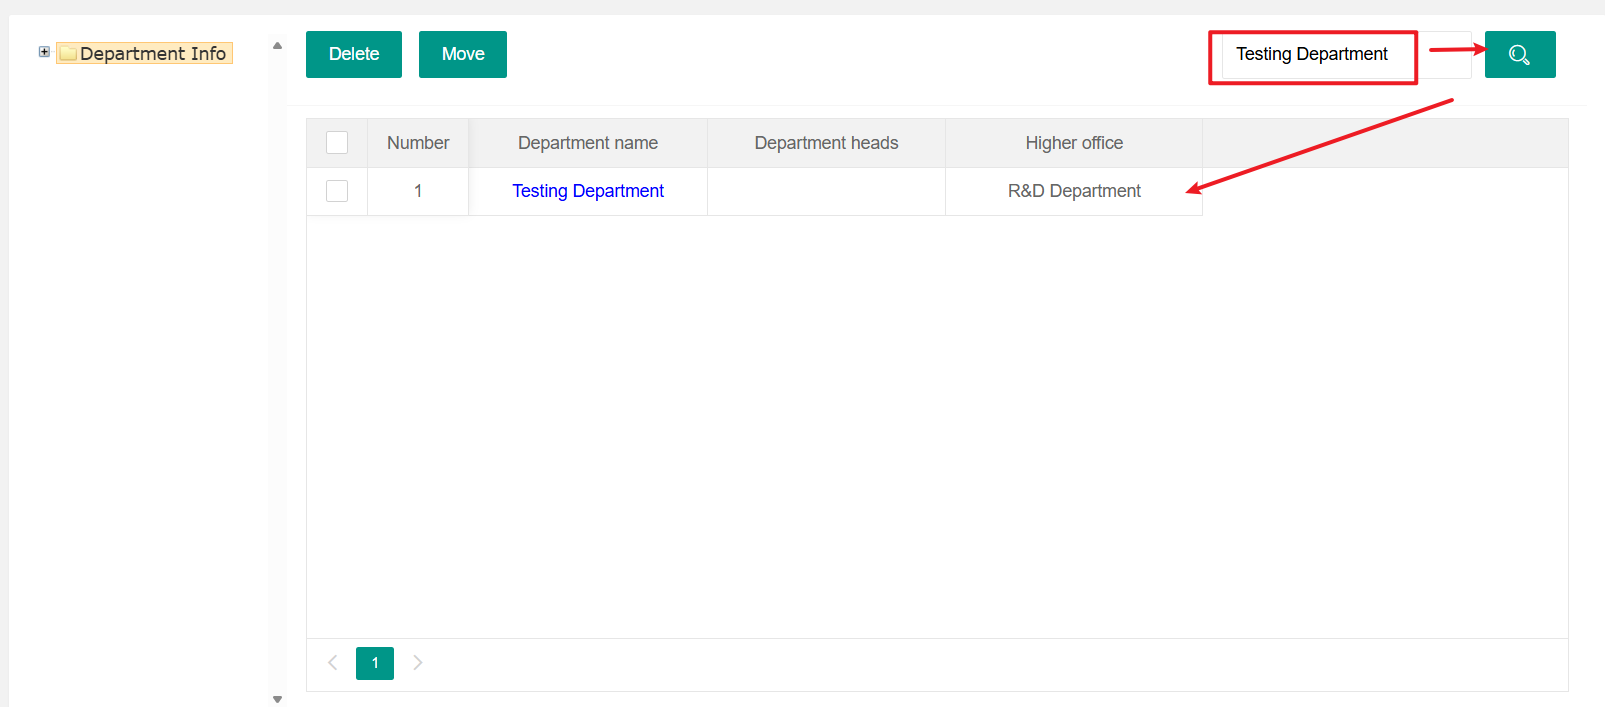
Enter the name of the department you want to query and click on the query icon
(4)Delete department
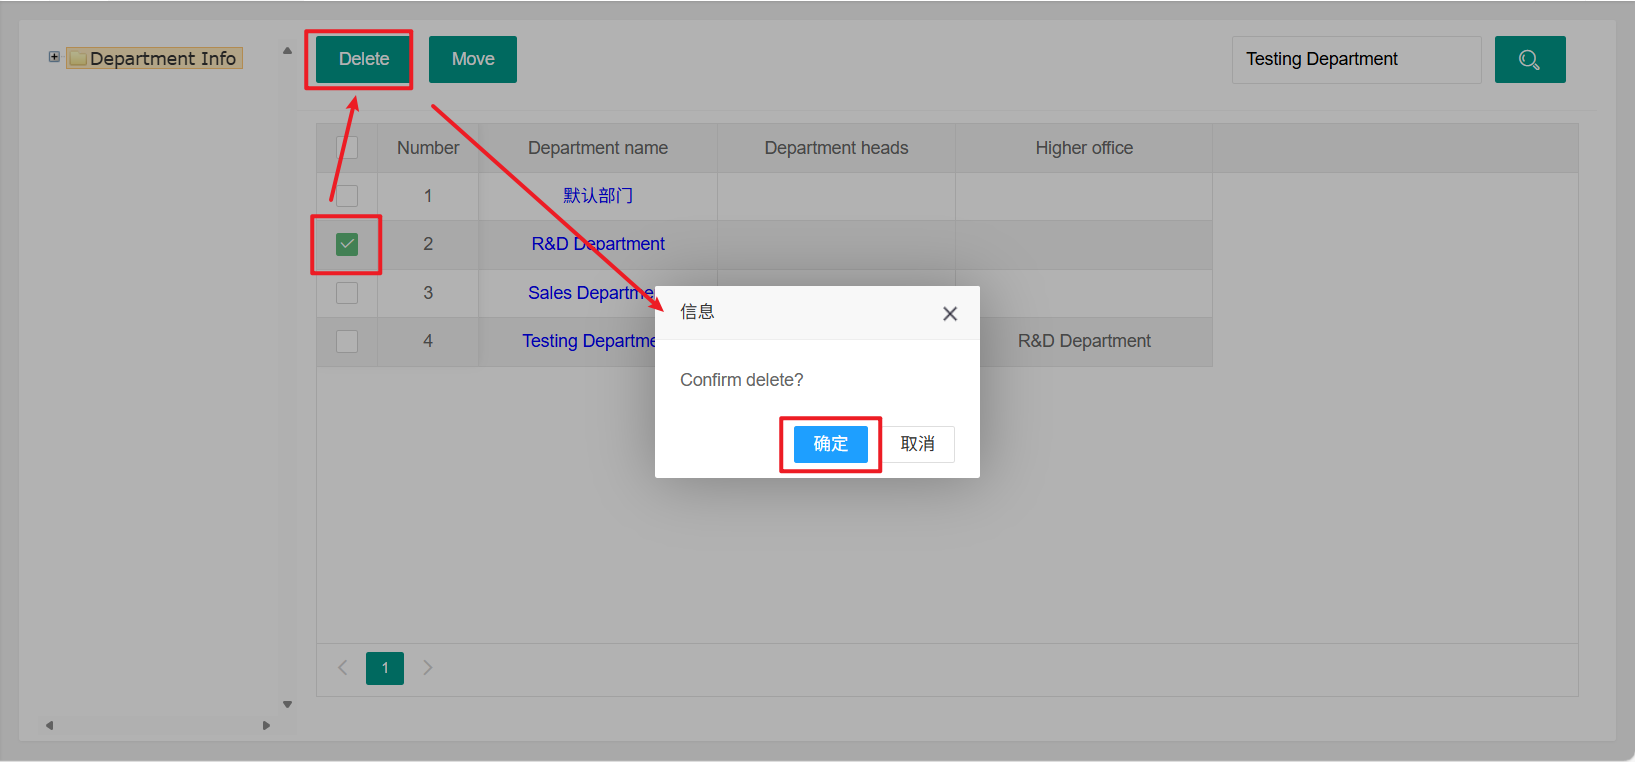
Select the department you want to delete, click the "Delete" button, and then click "OK"
2、Employee Information
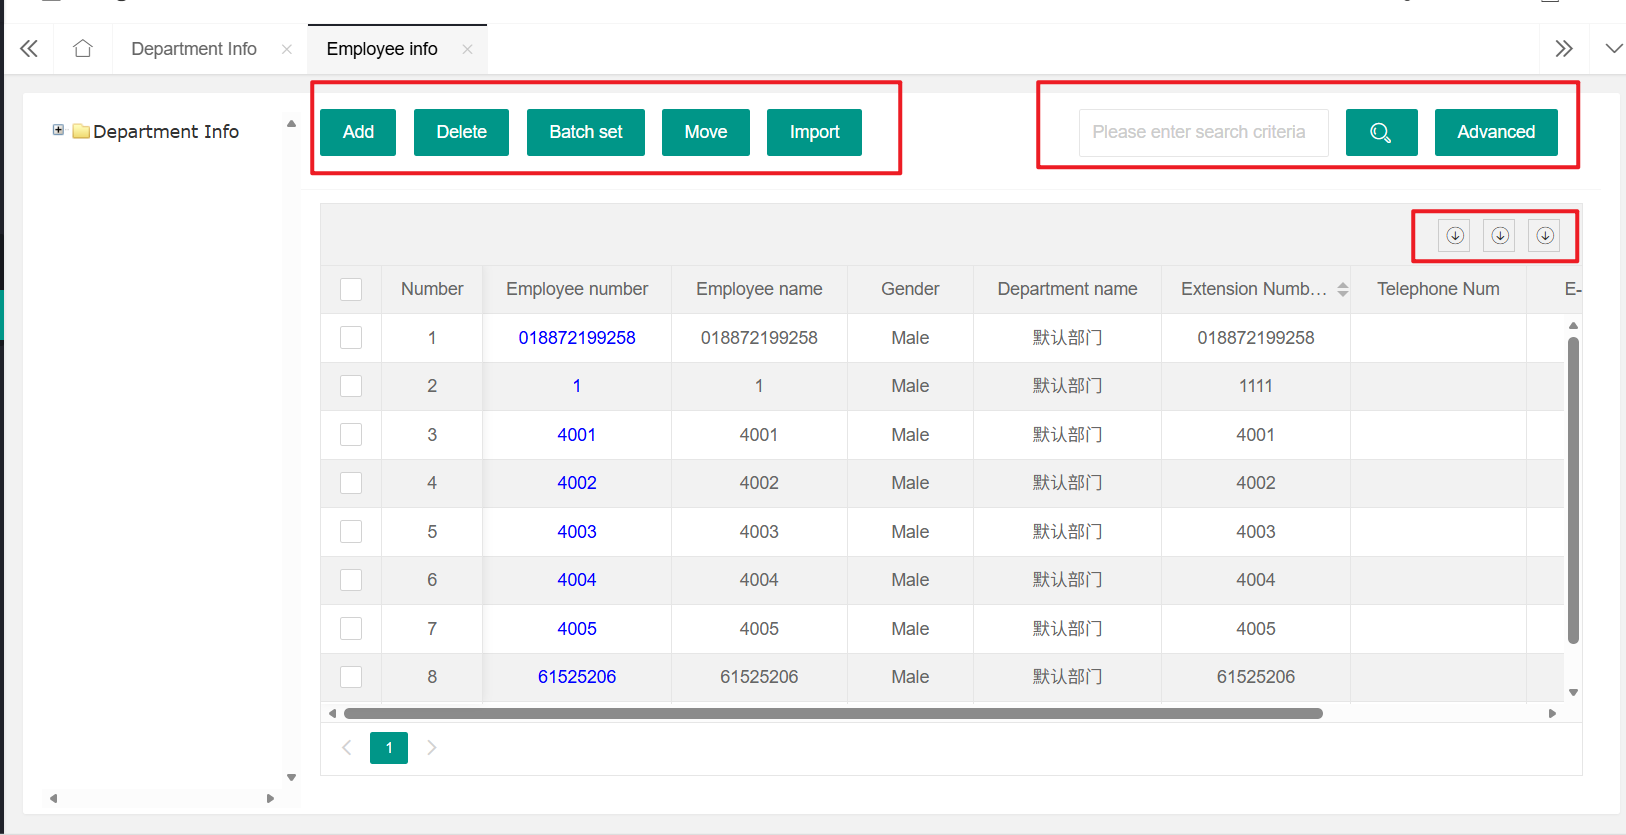
Employee information function introduction: Add, delete, batch settings, move, export, query, advanced query, export
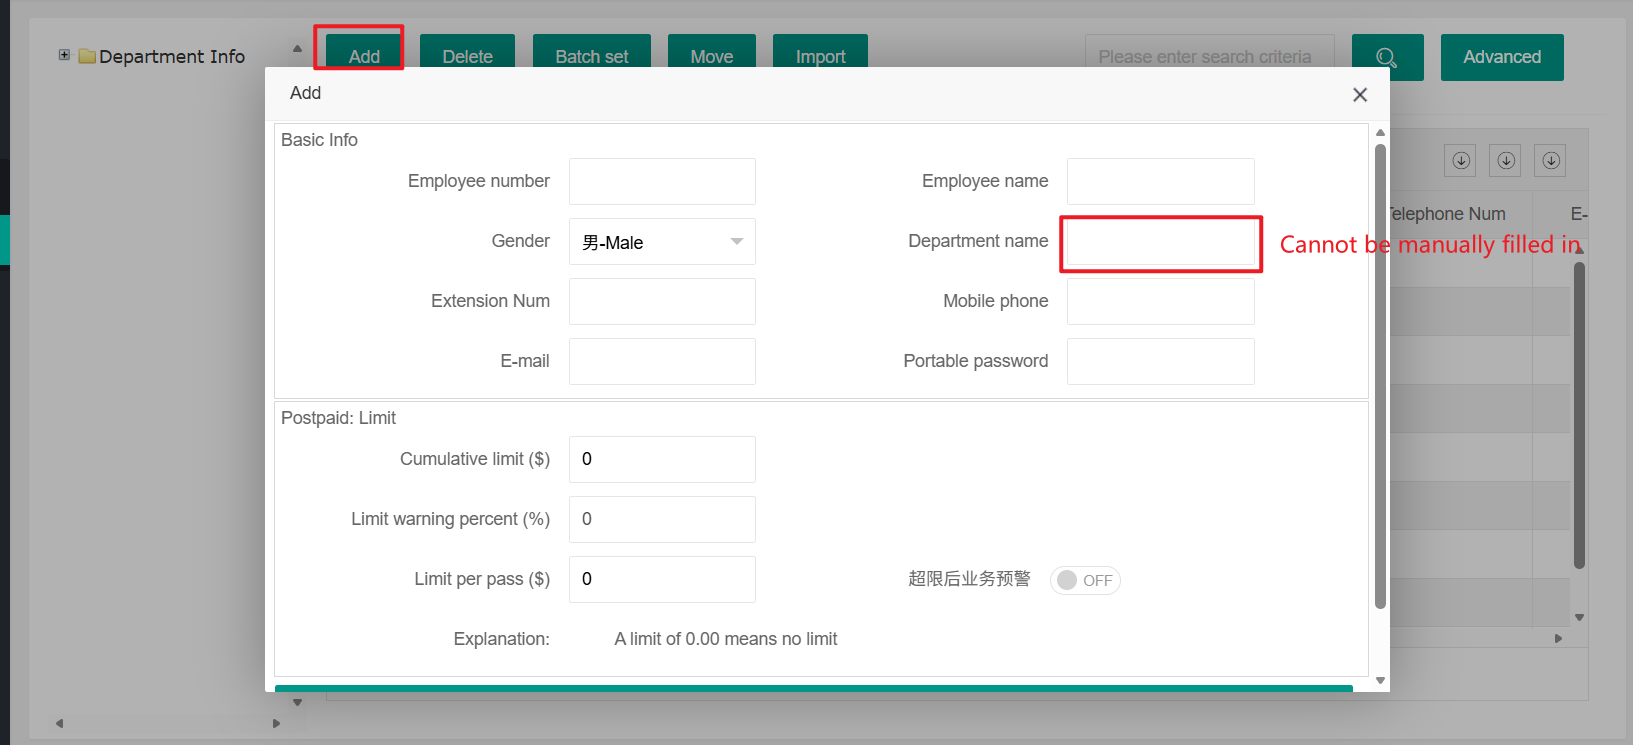
(1)Add employee
New Employee Information: Organizational Structure - Employee Information - Add
For example:
Organizational Structure - Employee Information - Add, fill in employee information as needed
Note: The department name cannot be manually filled in and can only be selected after the corresponding department information has been added
After filling in, click "Save"
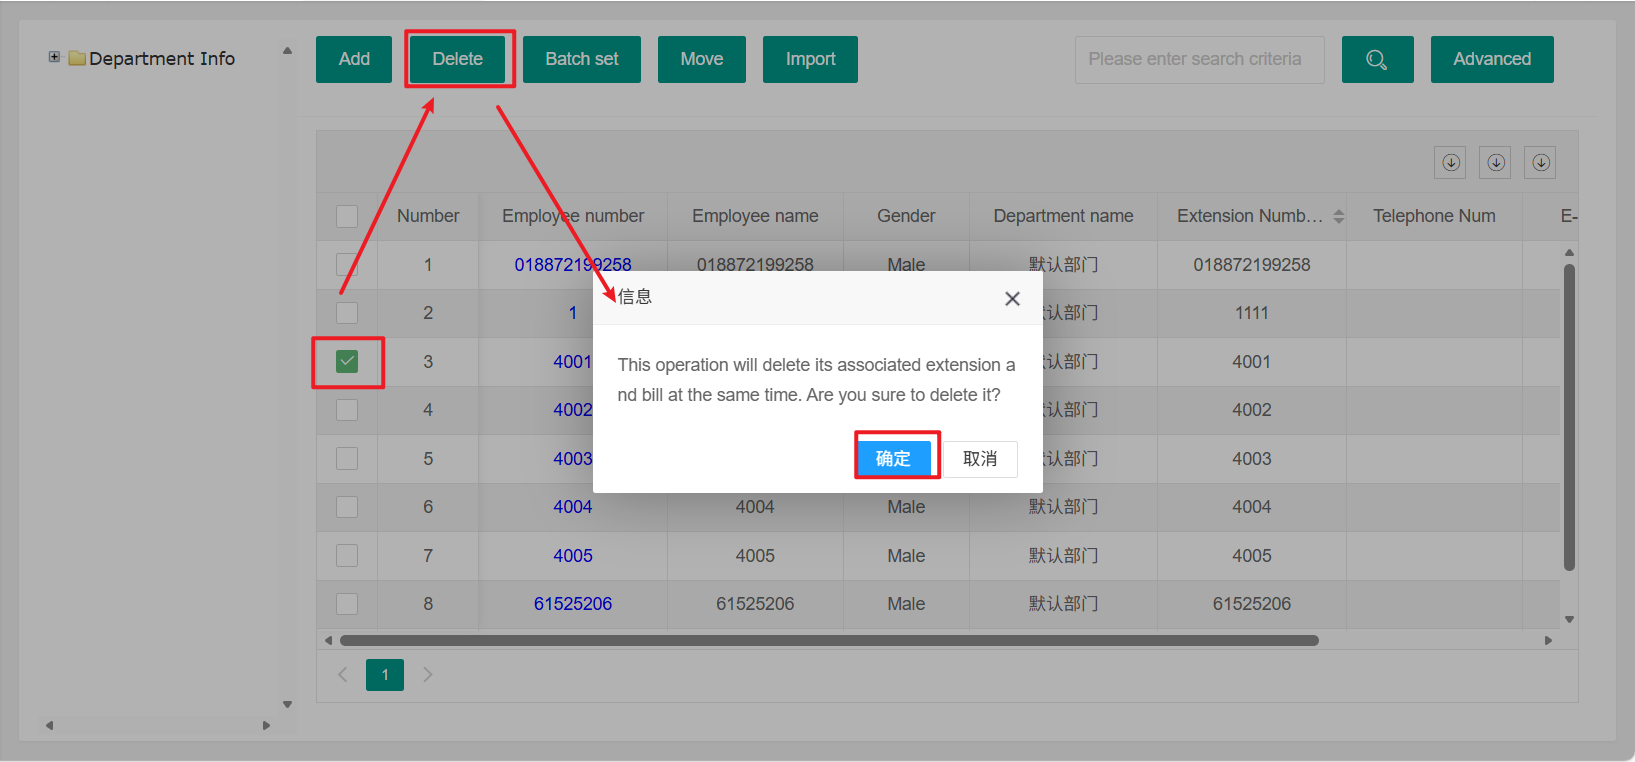
(2)Delete employee
Select the employee you want to delete, and click the delete button
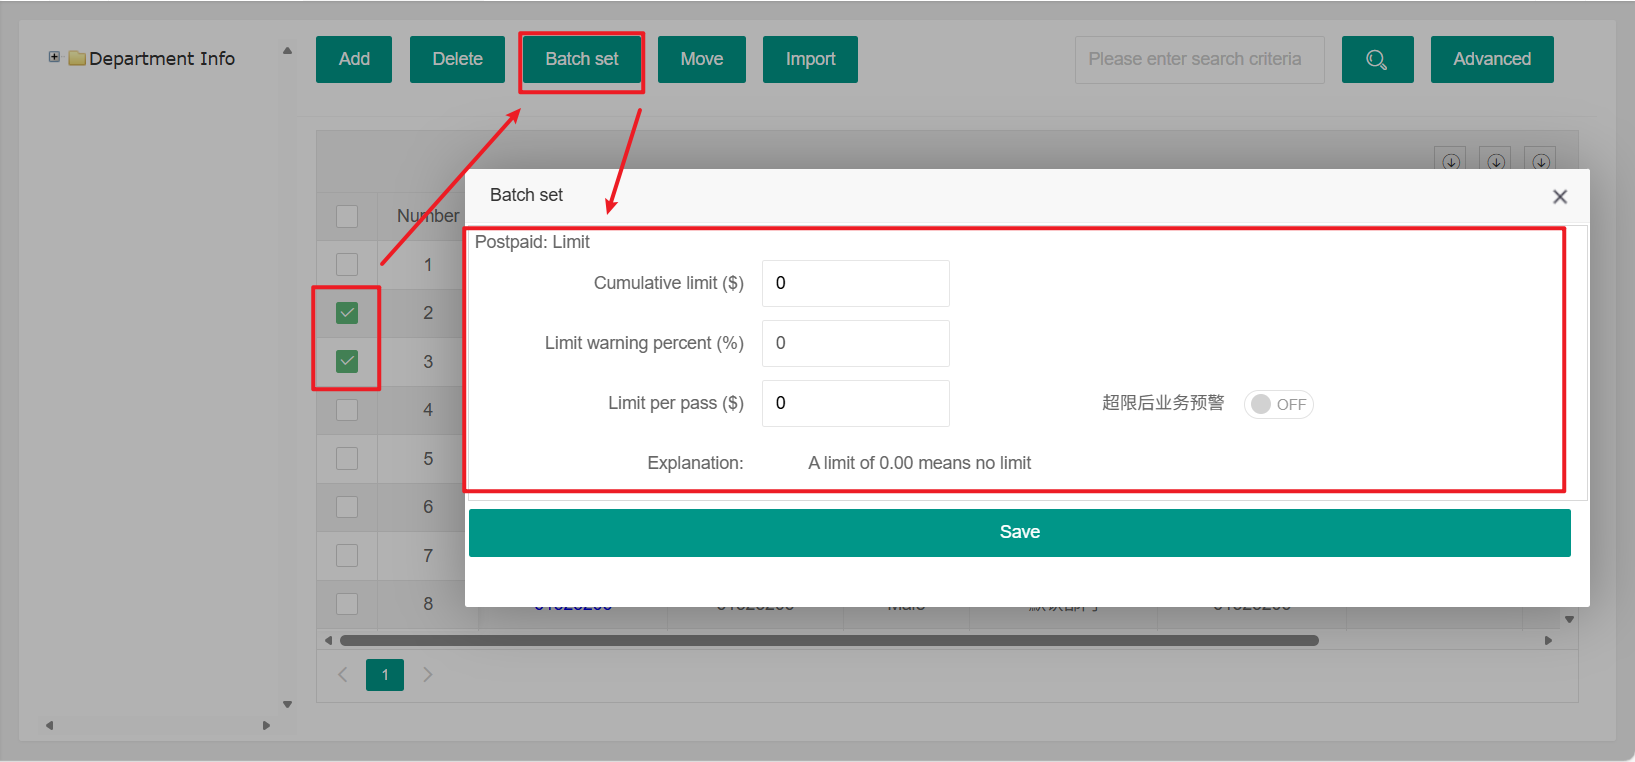
(3)Batch setting of employees
Select the employees you want to batch set, and click the batch setting button
Note: Batch settings can only set the postpaid cost limit
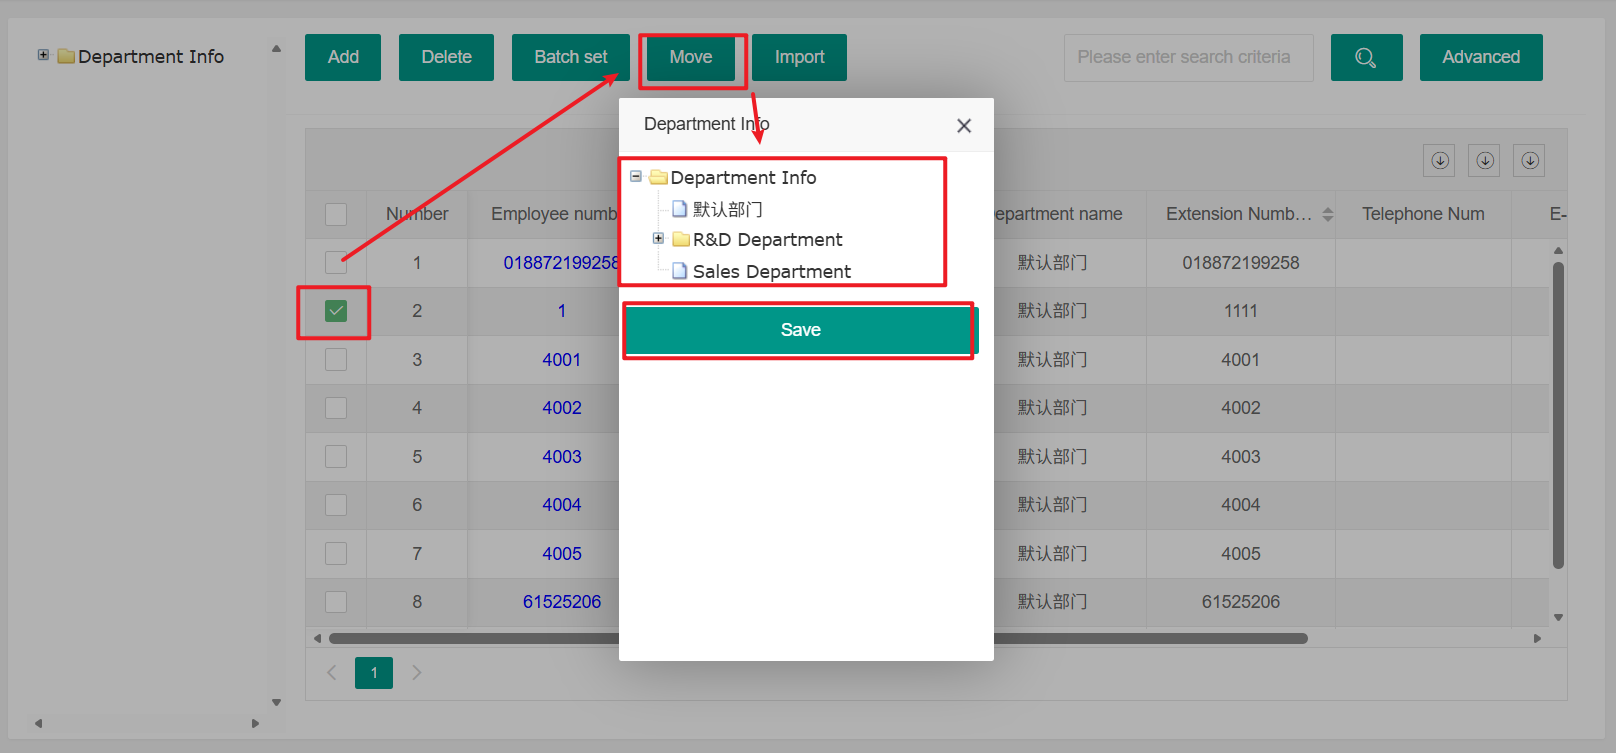
(4)Move employee
Select the employee you want to move, click the move button, and choose the department you want to move to
(5)Import employees
Click the 'Import' button to batch import employees
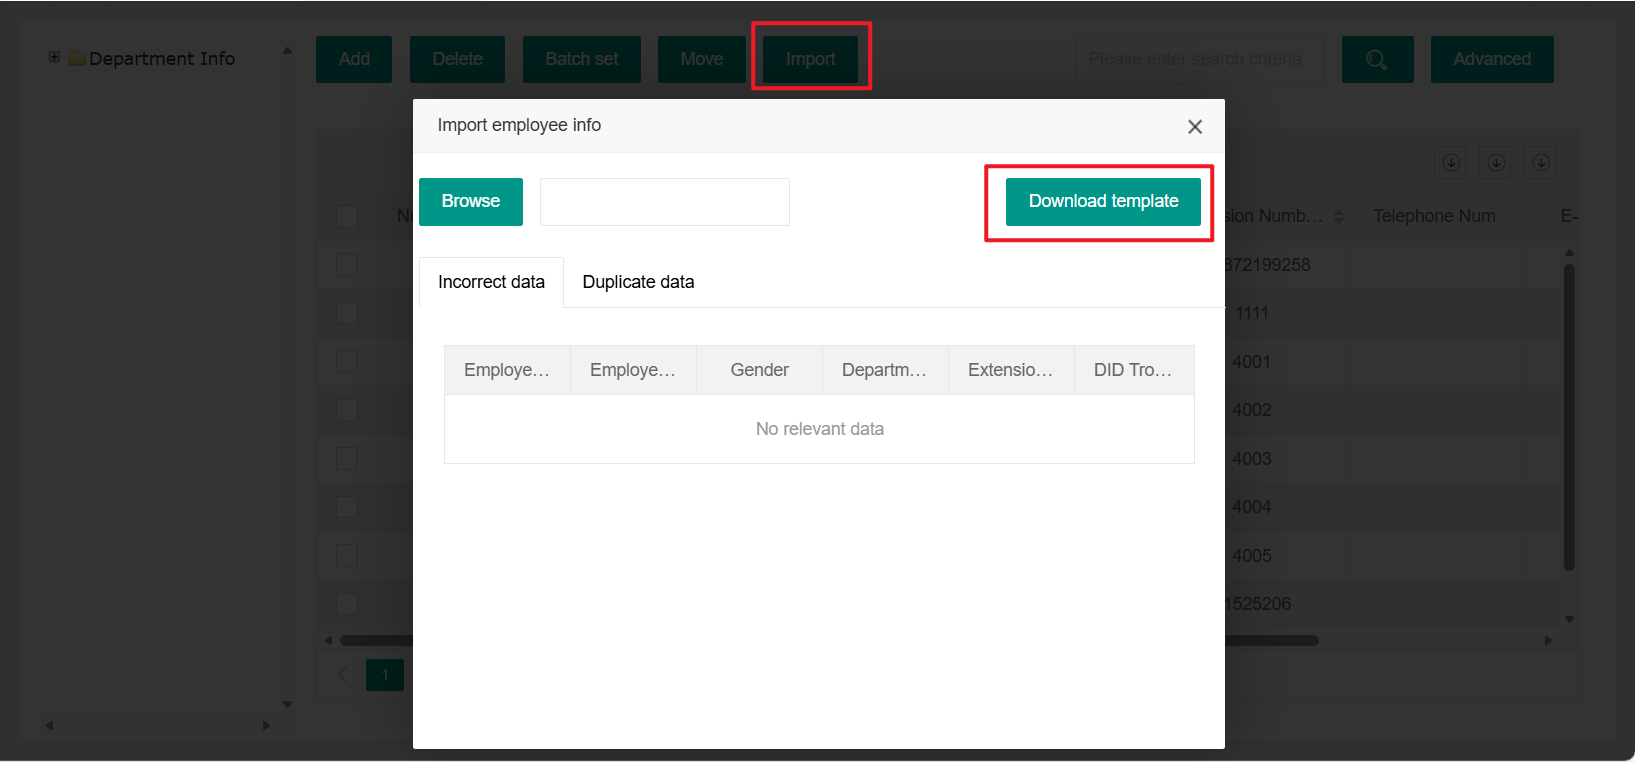
Open "Employee Information", click "Import", and the "Employee Import" page will pop up;
First select "Template Download", download the template
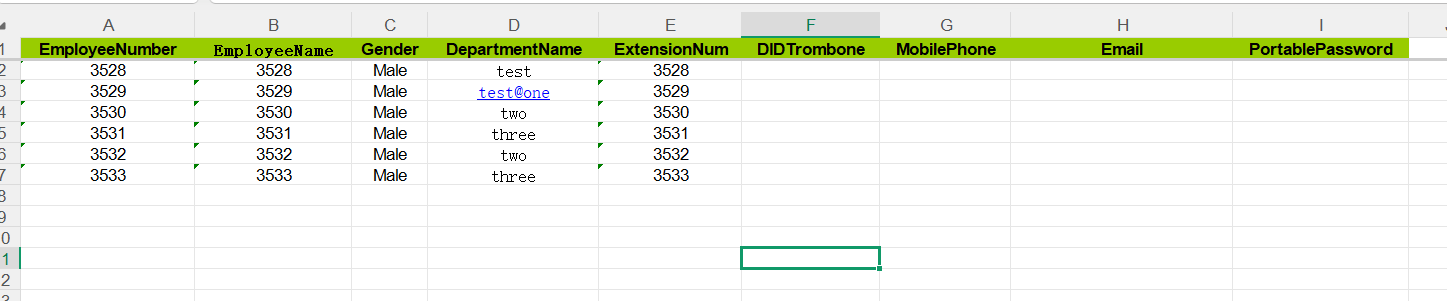
Fill in the employee import information according to the downloaded import template, for example:
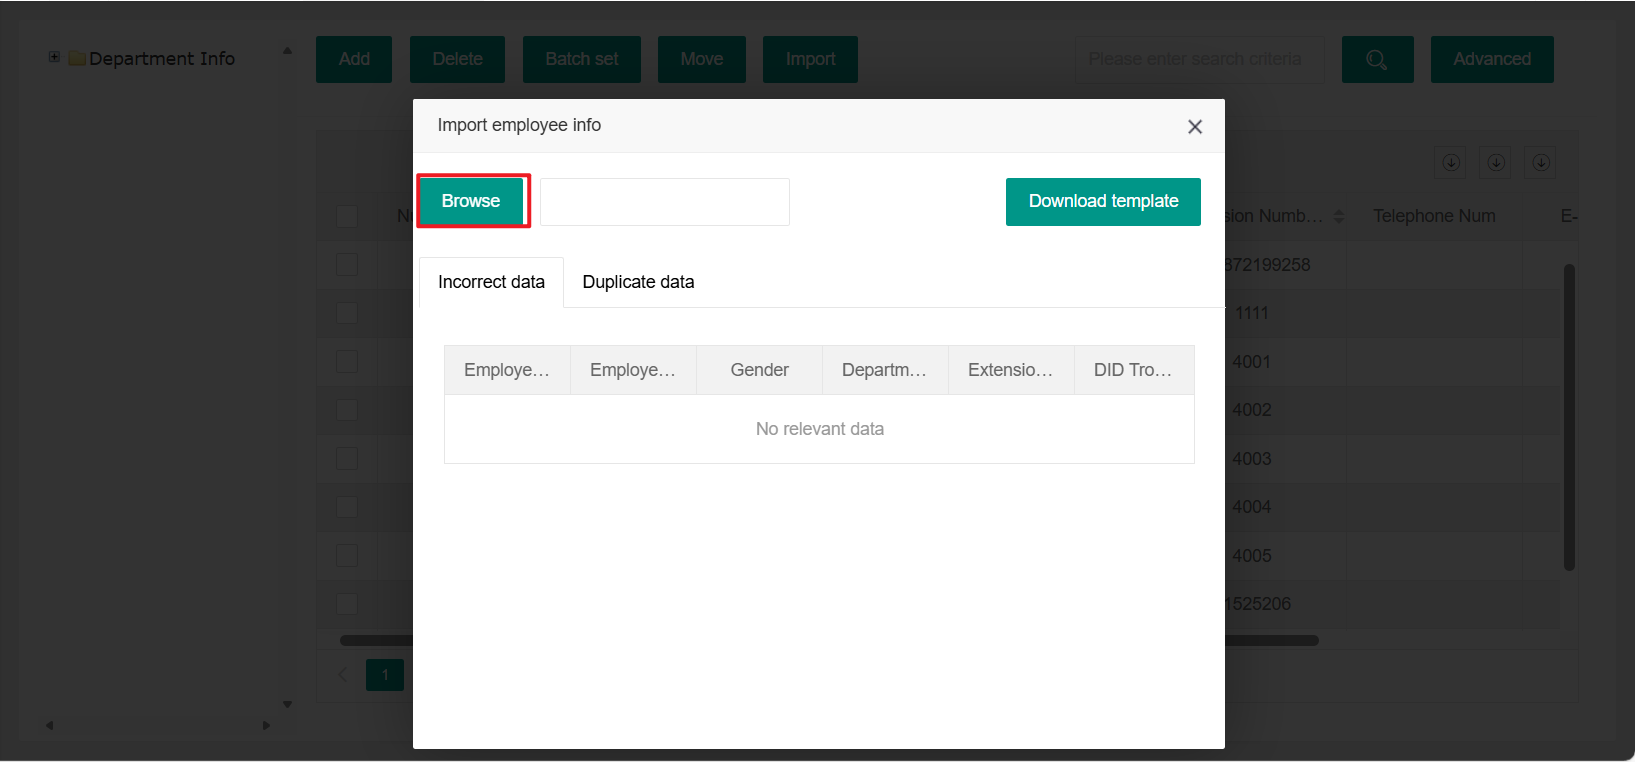
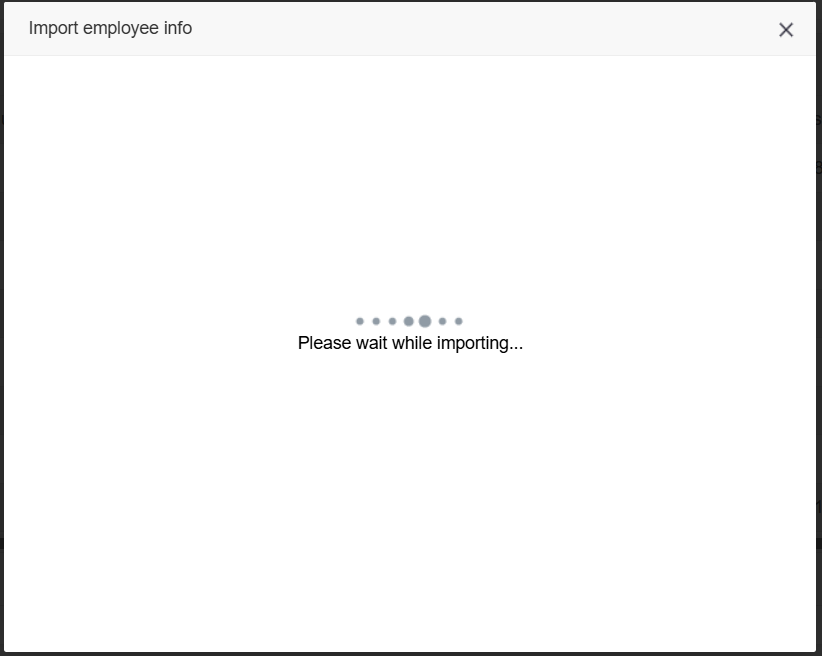
Click "Browse", select the file to import, and the software will automatically read the file. If the information is correct, it will display "Importing, please wait" for example:
(6)Query employees
Enter the name of the employee you want to query and click on the query icon
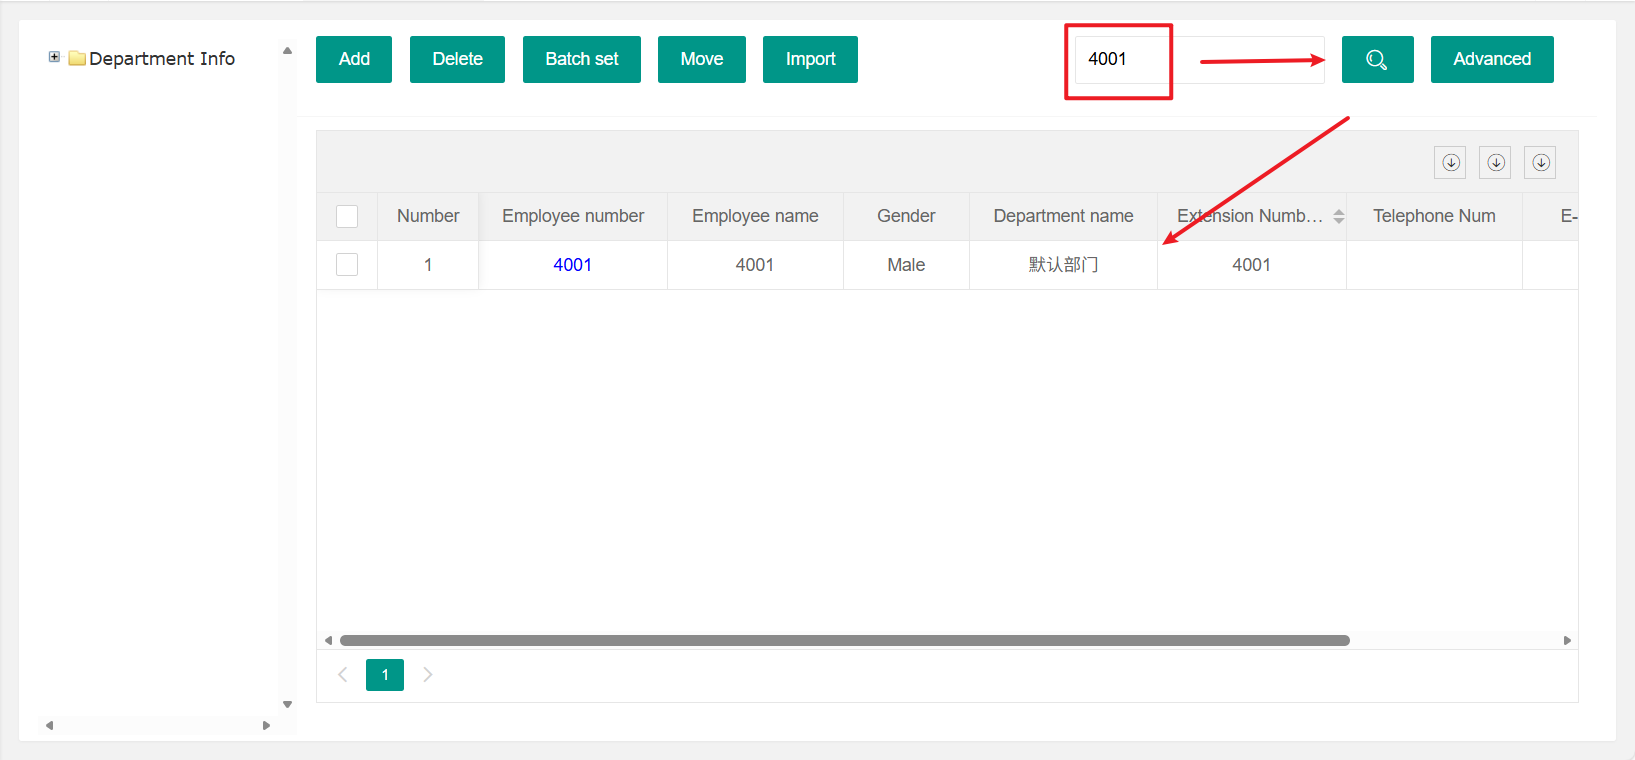
(7)Advanced query
Click on the advanced query and fill in the detailed information of the employee you want to query
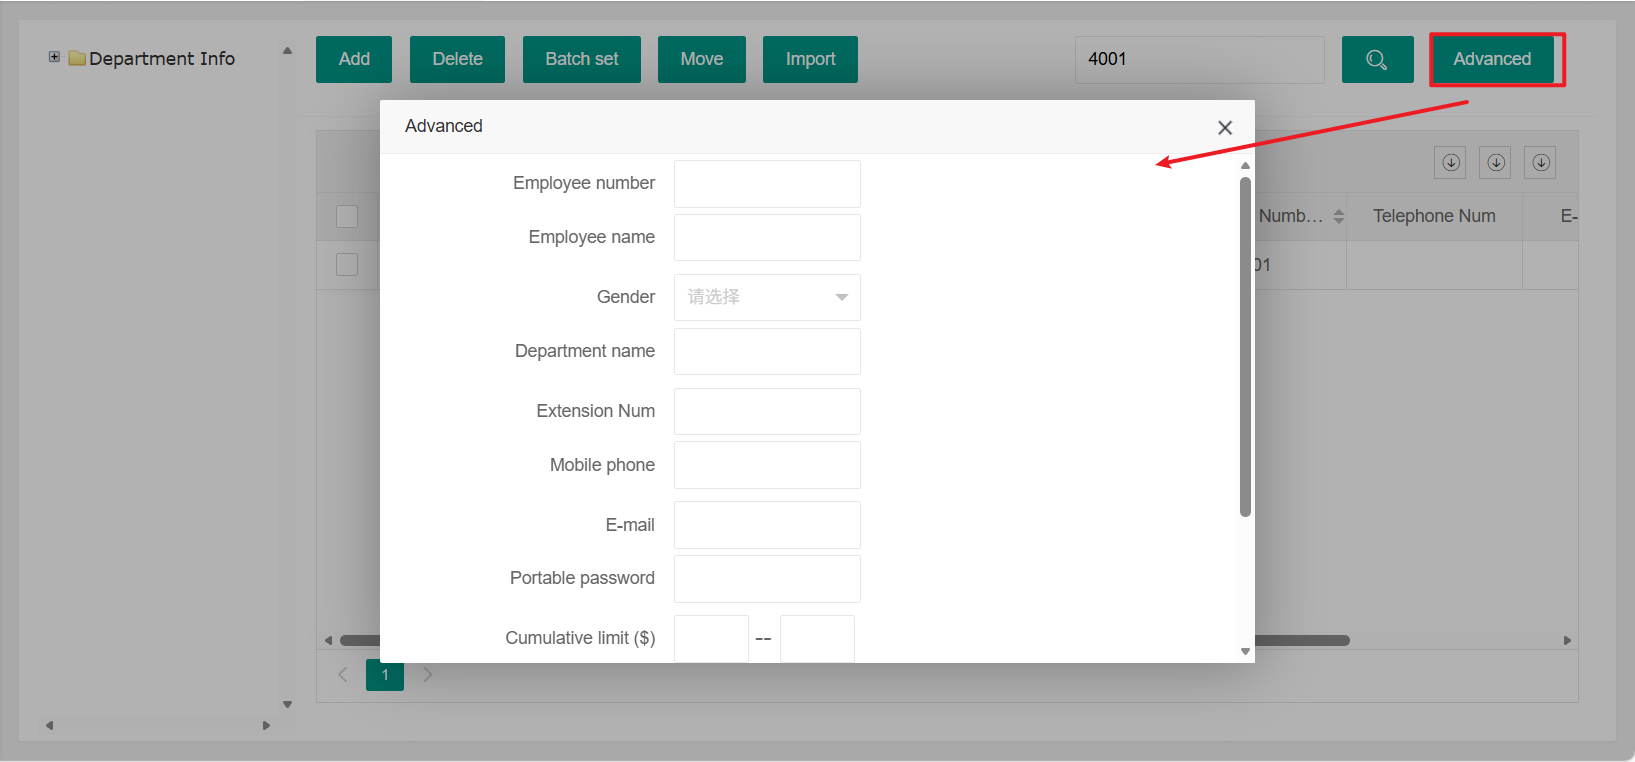
(8)Export employees
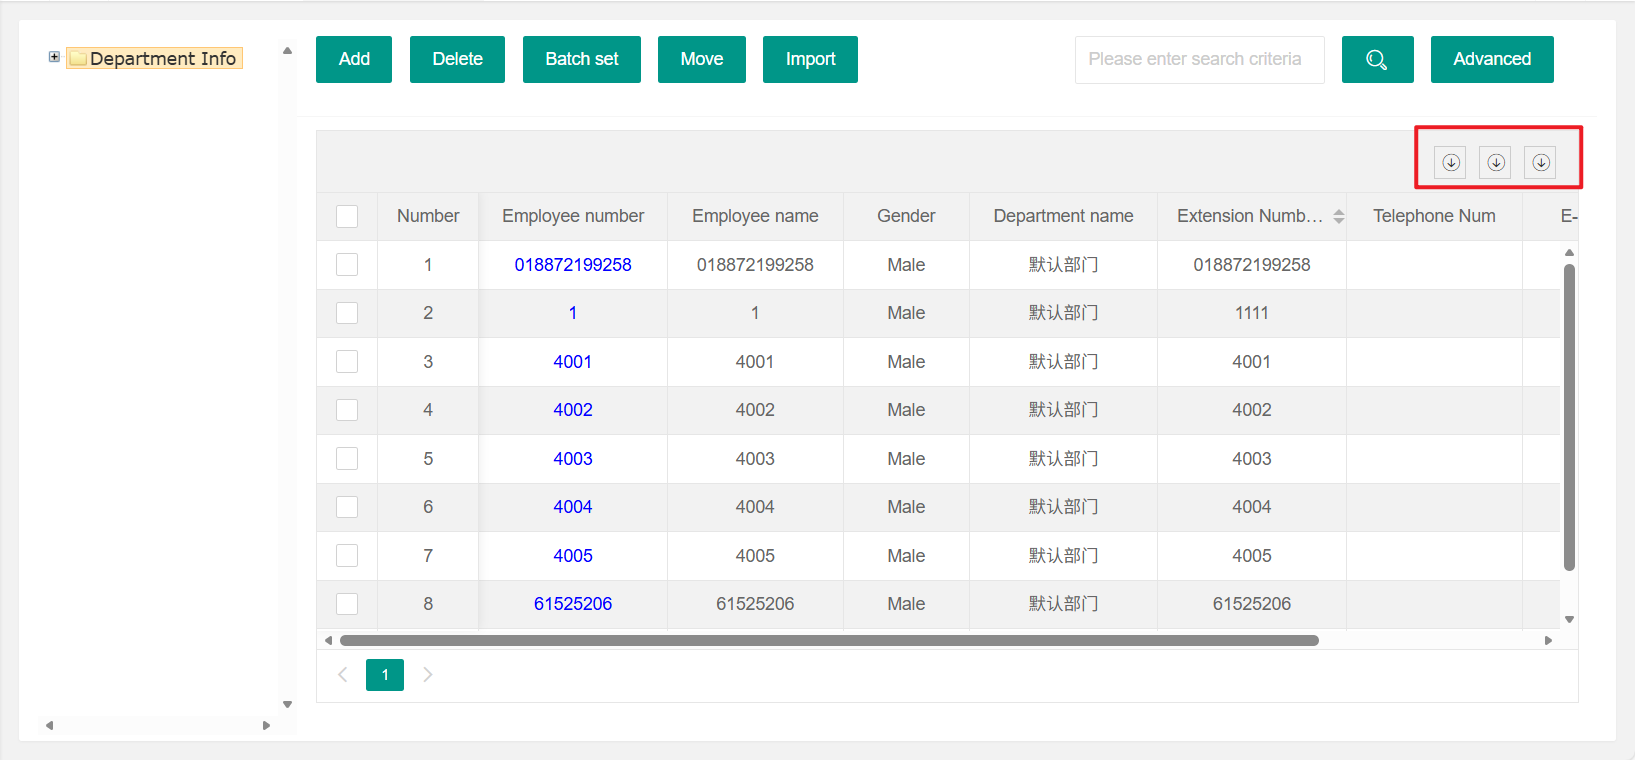
Employees can be imported, of course, they can also be exported
Employee export optional export file types: export a single file, a single file split by multiple tags by department, and multiple files split by department, select the type to export
Export a single file: all data is placed in a single worksheet of the exported excel file
Single file split by multiple tags by department: export excel file, split by department, each department in a worksheet
Multiple files split by department: split by department, one department is one excel file
四、Voice switch settings
Voice switch settings mainly have the following functions (as shown in the figure below)
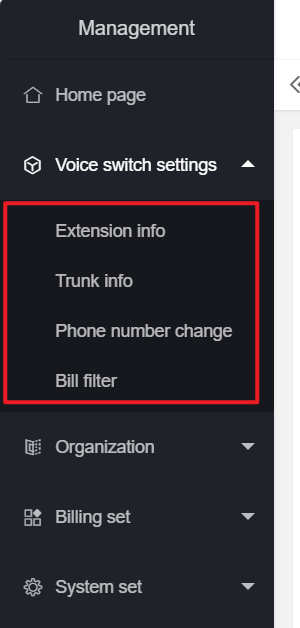
1、Extension information
Extension information functions: add, batch add, delete, query
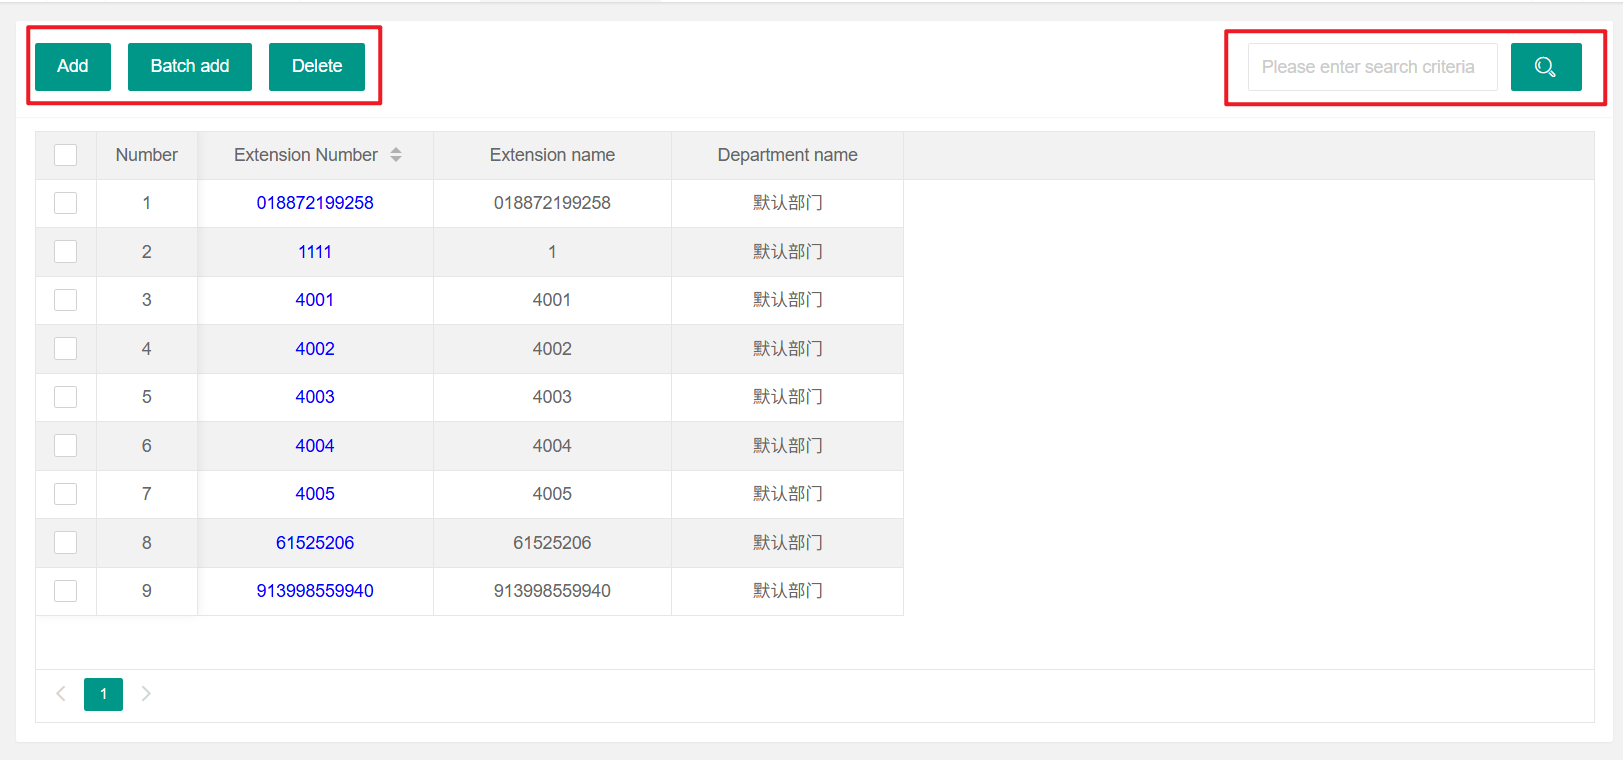
(1)Add extension
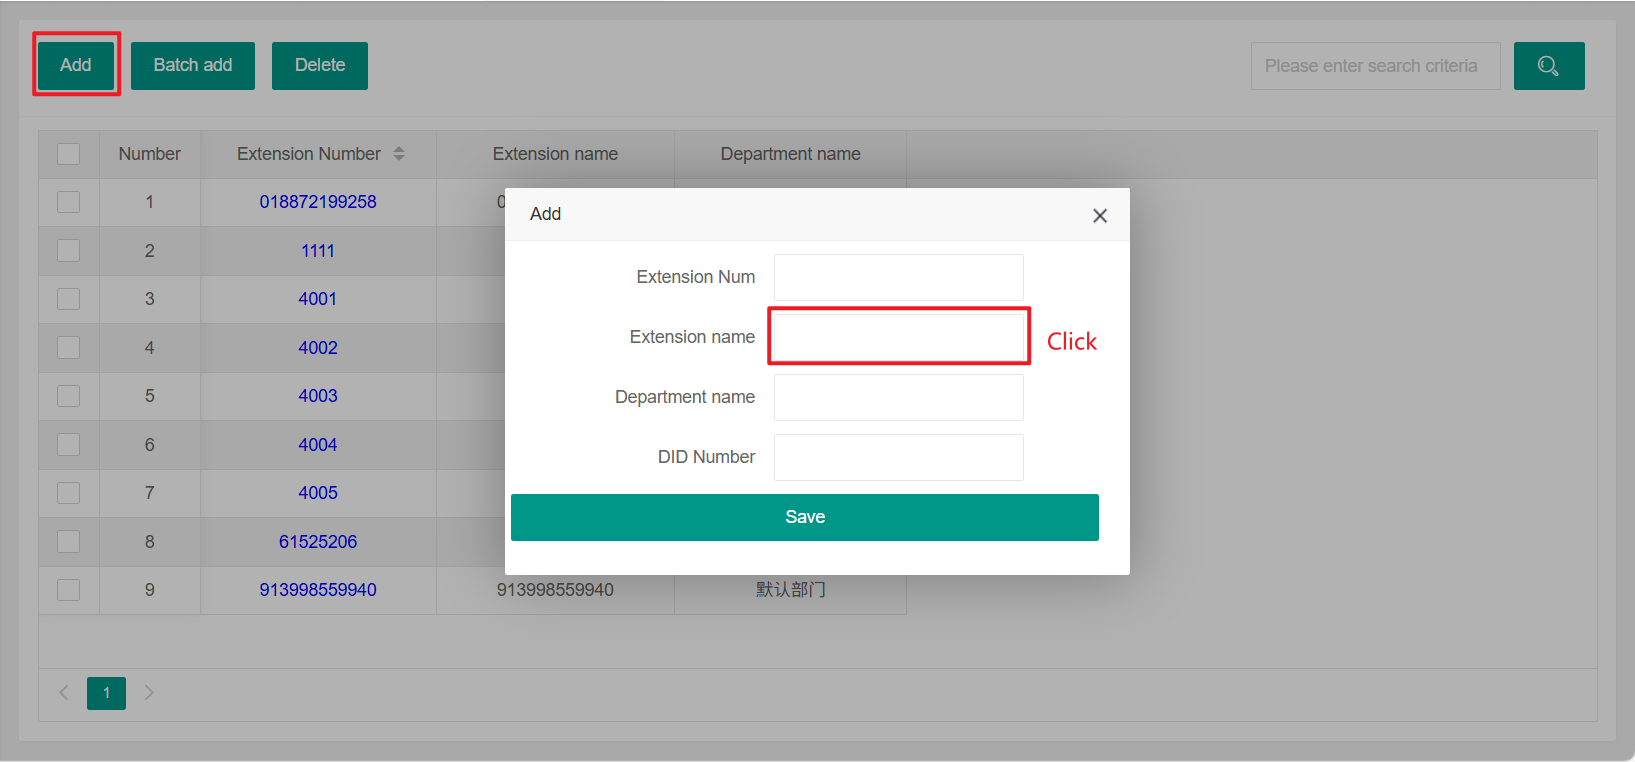
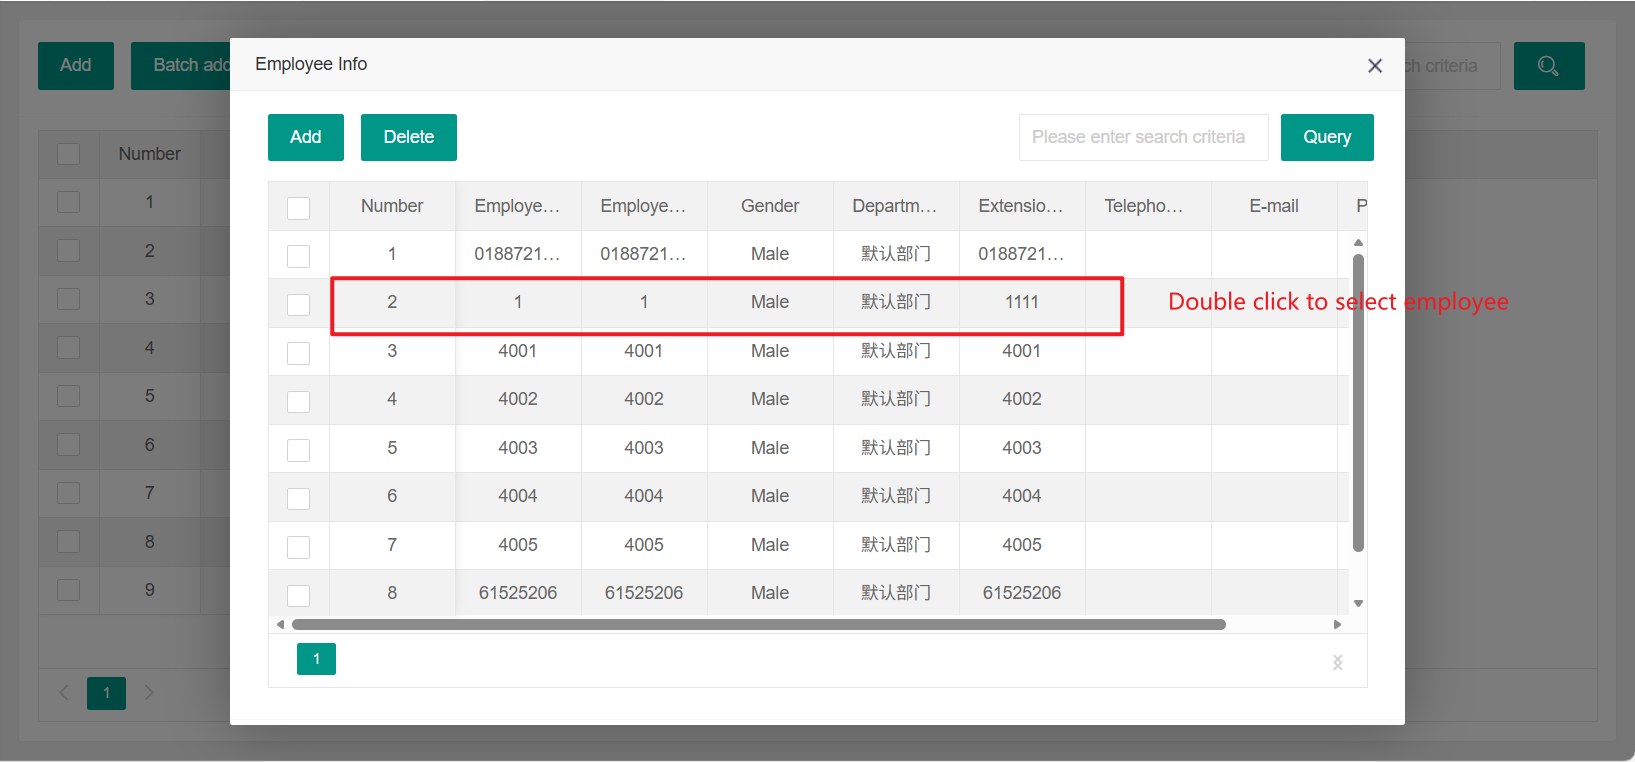
Add "Extension Information", click "Extension Name", select the newly created employee information, the department information will be synchronized with the employee, and the other extension attributes can be filled in as needed and saved
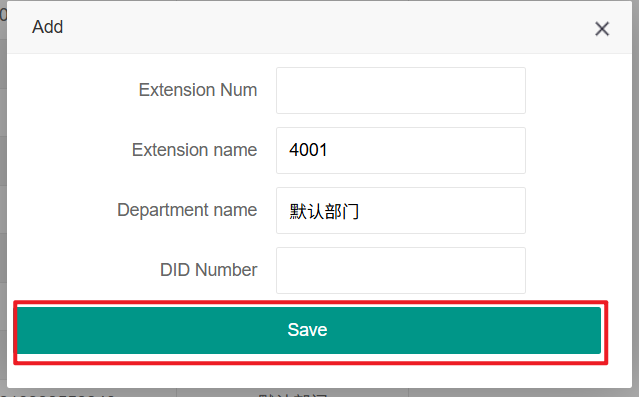
Fill in the information and click "Save"
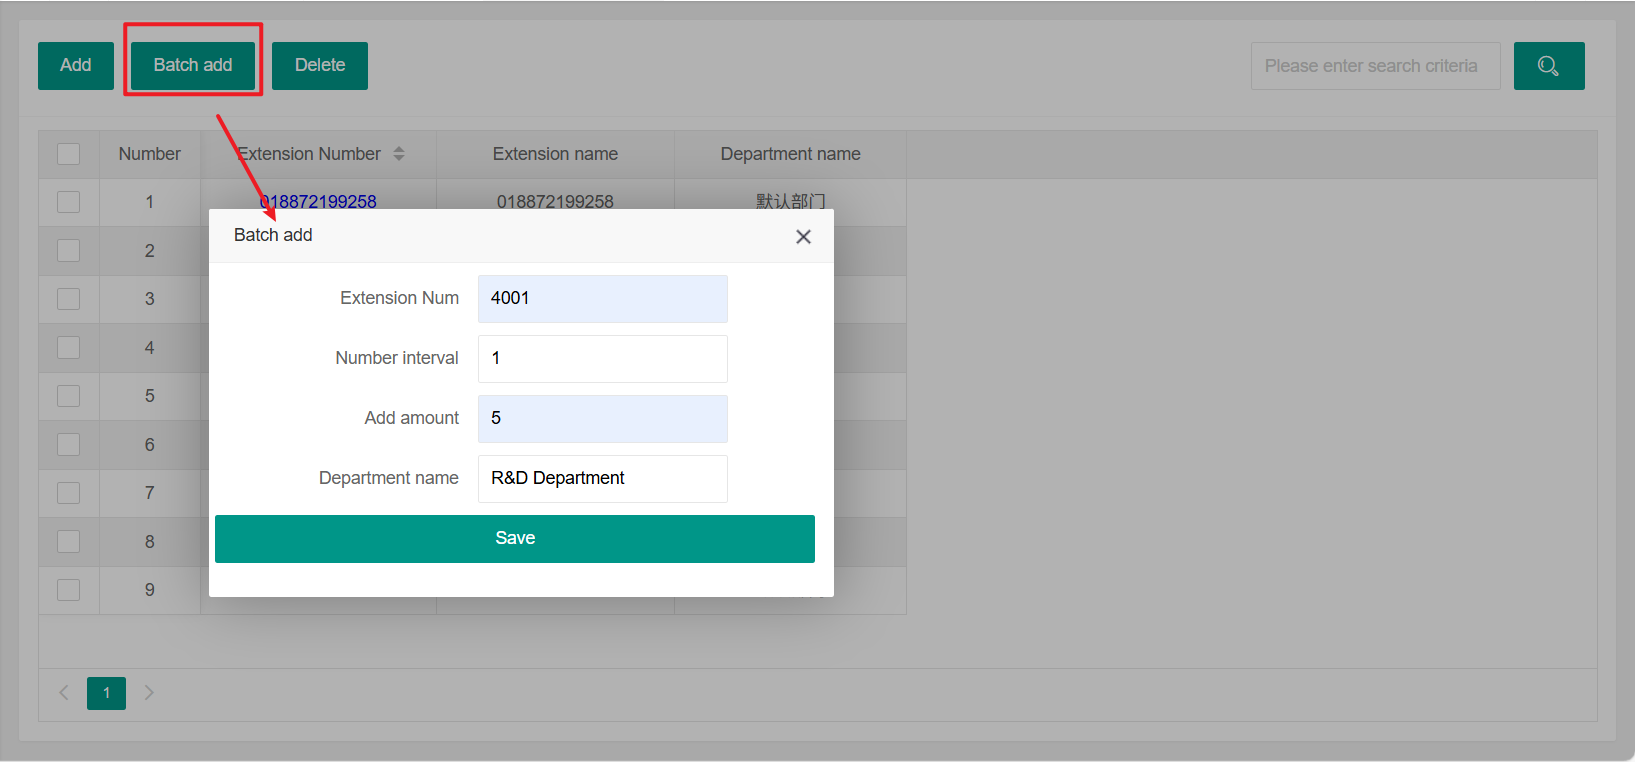
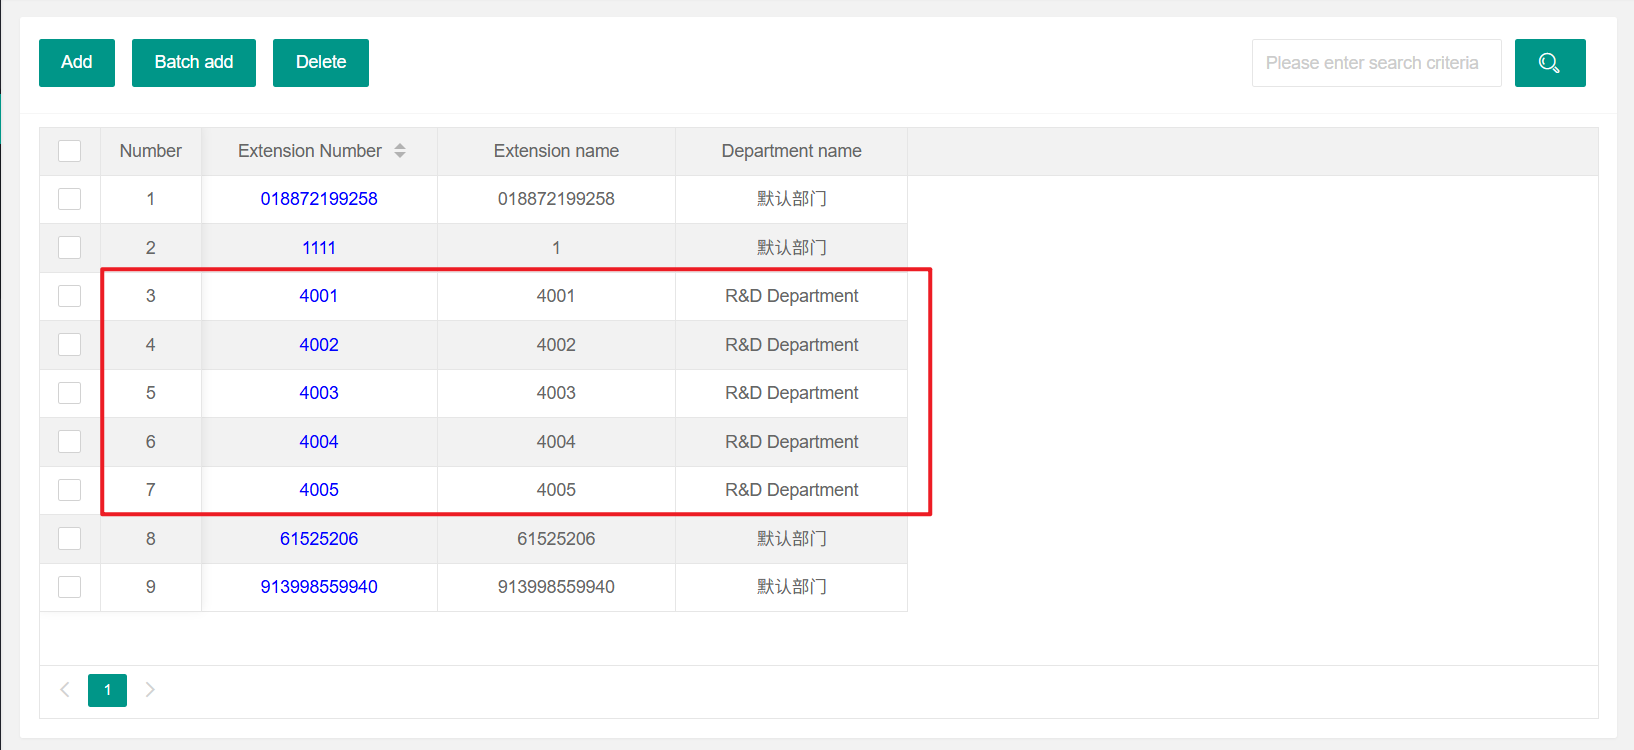
(2)Batch add extensions
Extension information can be batch added with extension numbers and related employee information
(If the extension numbers are continuous and numerous, it is recommended to use batch addition)
Open "Extension Information", click "Batch Add", fill in the conditions, and click "Save"
(3)Delete extensions
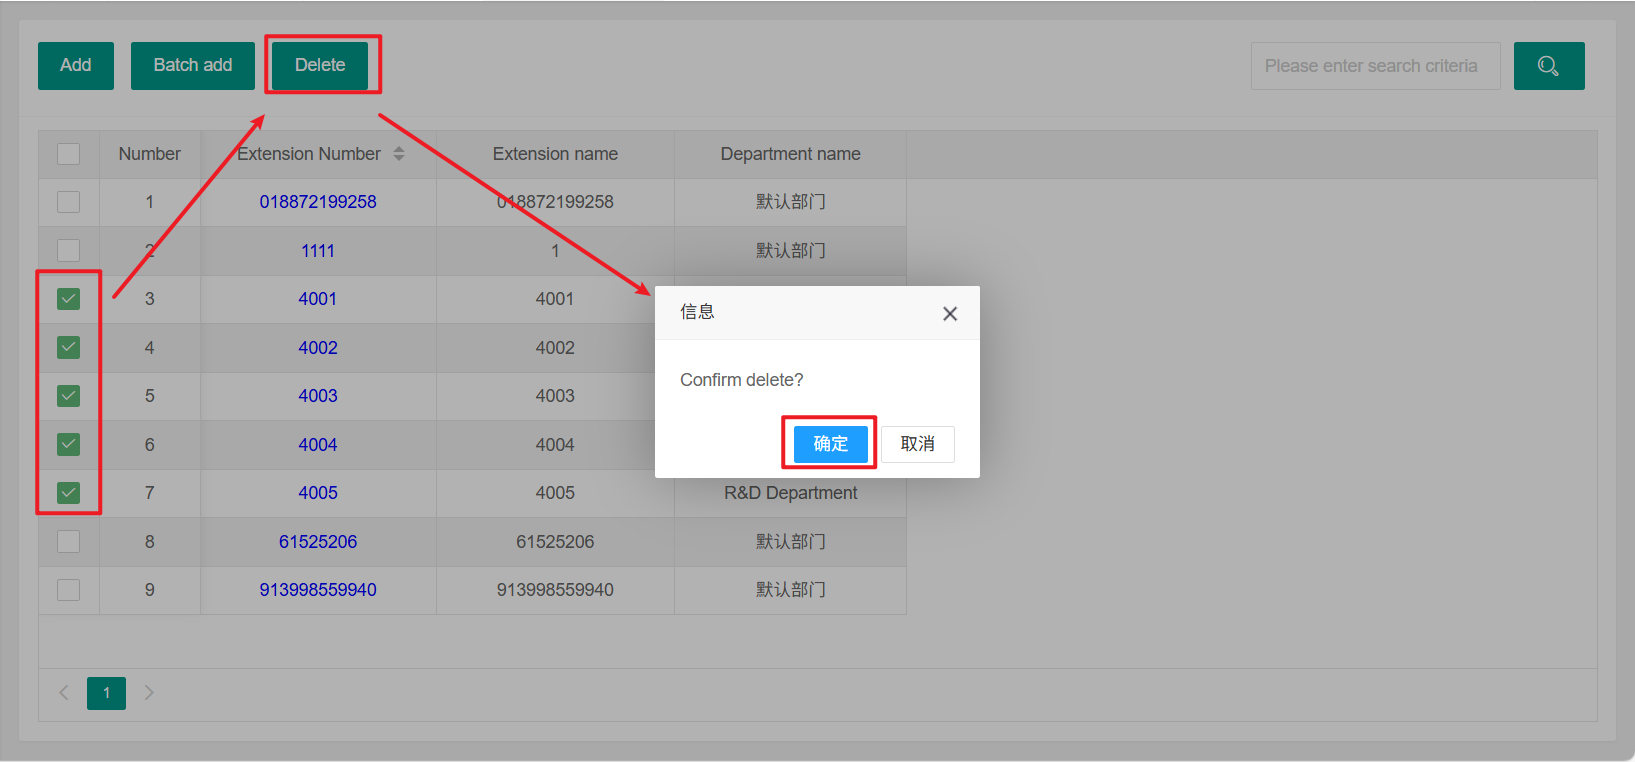
Select one or more extensions and click the delete button to delete one or more extensions
(4)Query extension
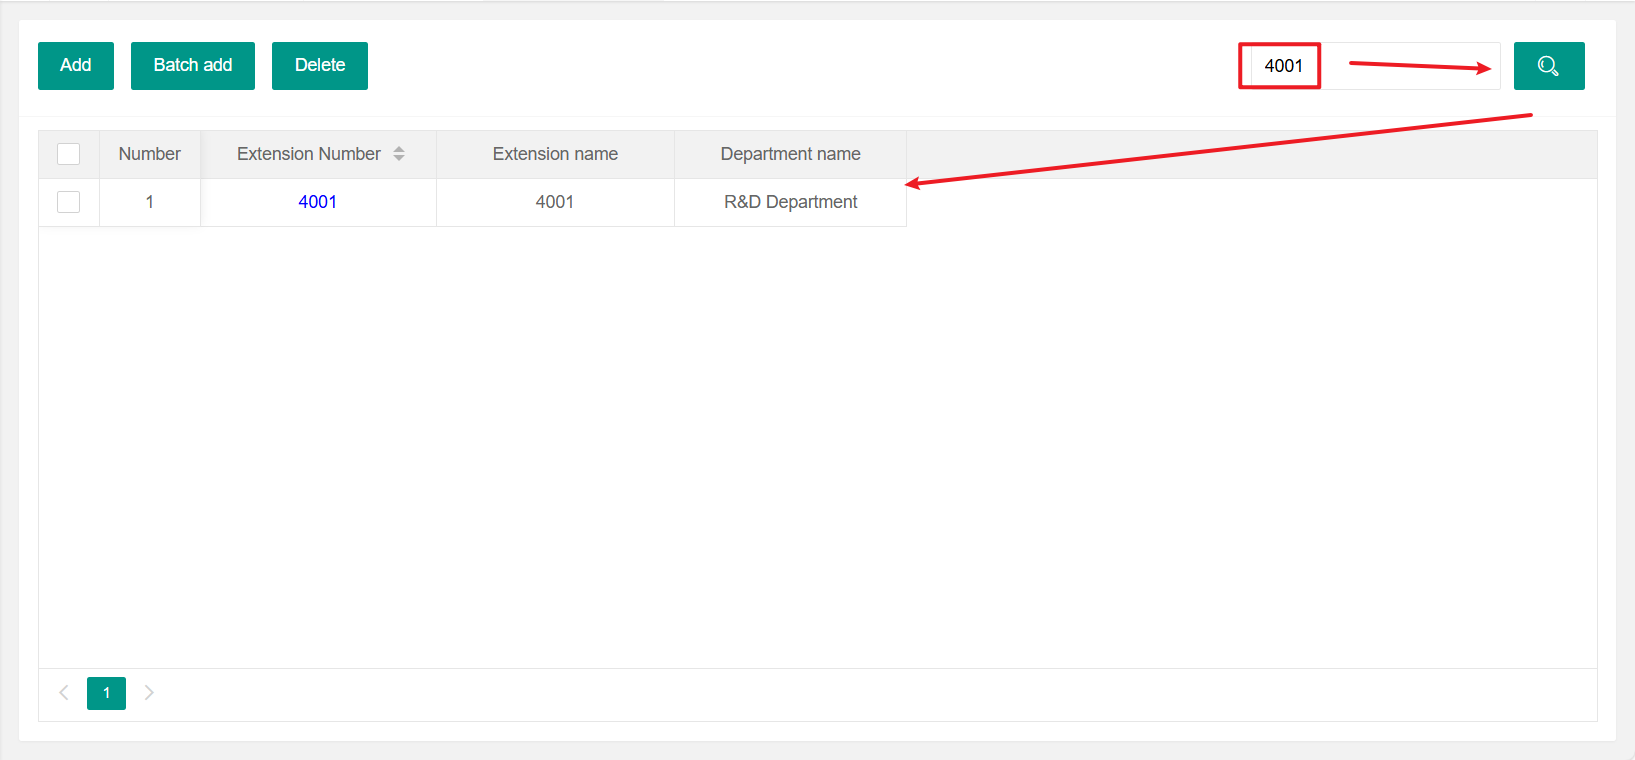
Enter the extension information you want to query, click on the query button
2、Trunk Information
This module is intended for use by technicians, so it will not be explained here
3、Phone Number Change
This module is intended for use by technicians, so it will not be explained here
4、Bill Filter
This module is intended for use by technicians, so it will not be explained here
五、Billing Set
The billing settings mainly have the following functions (as shown in the following figure)
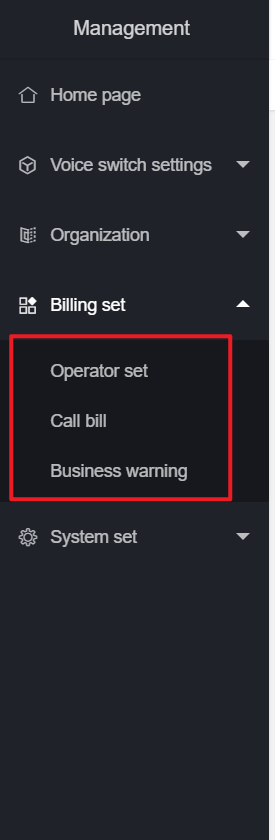
1、Operator Set
This module is intended for use by technicians, so it will not be explained here
2、Call Bill
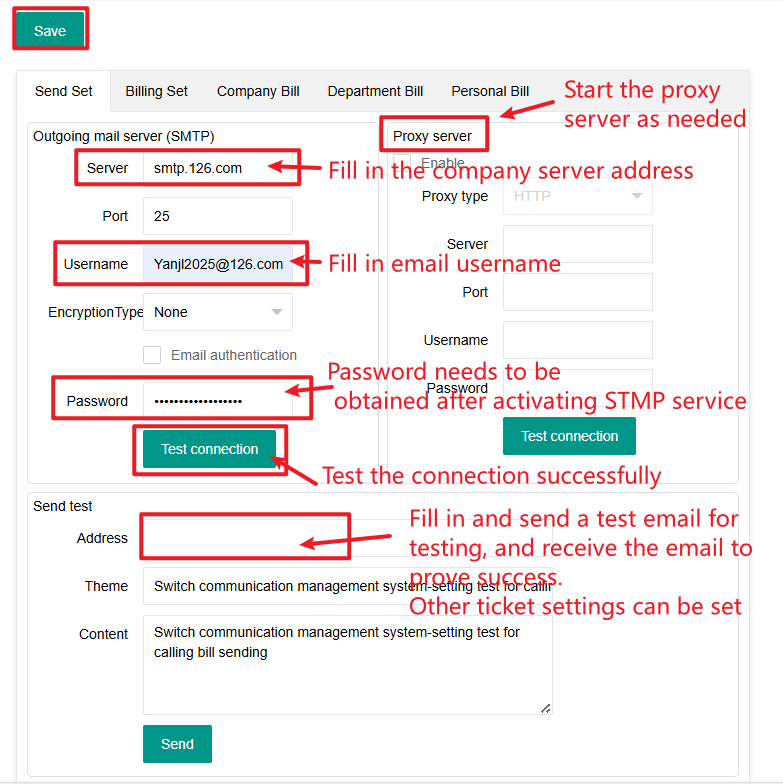
(1)Send settings
Send settings: is used to test whether the email can be used to send bill settings
Email sending server (SMTP)
Server address: fill in the company server address
Port number: default
Username and password: fill in the email and password of the company's billing email (the username must be filled in completely)
Note: If it is a personal email, please follow the guidance of the personal email website to open the SMTP service, and obtain the SMTP opening password. The above server address, port number, username (for personal email), and password (for the authorization password given by the website after opening SMTP authorization) should be configured according to the website configuration requirements
Click "Test Connection", if "Connection Successful" is displayed, it is successful
Proxy server: Enable the server as needed. If the proxy server is enabled and there is a problem with the email sending server, the proxy server will send the email
Send test:
Address: Fill in the email address to receive the test email, click "Send", if the received email is received, it proves that the email server is no problem, and you can set other billing settings requirements
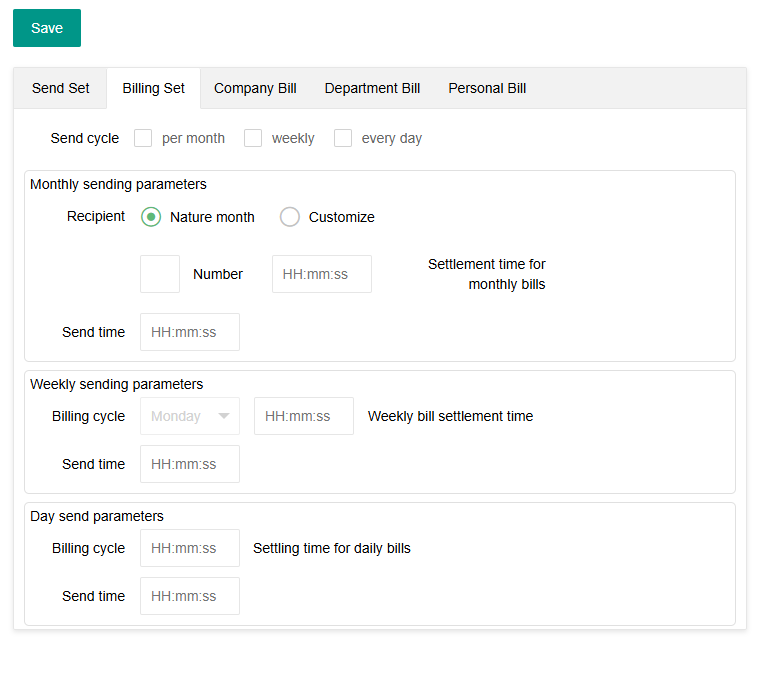
(2)Billing Settings
Set the billing cycle according to the requirements, set the parameters, and click "Save"
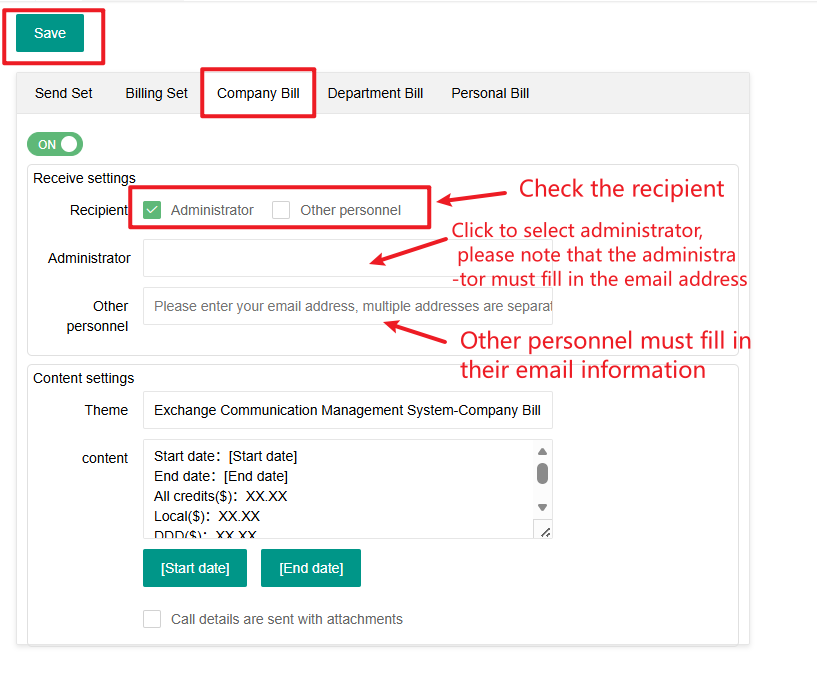
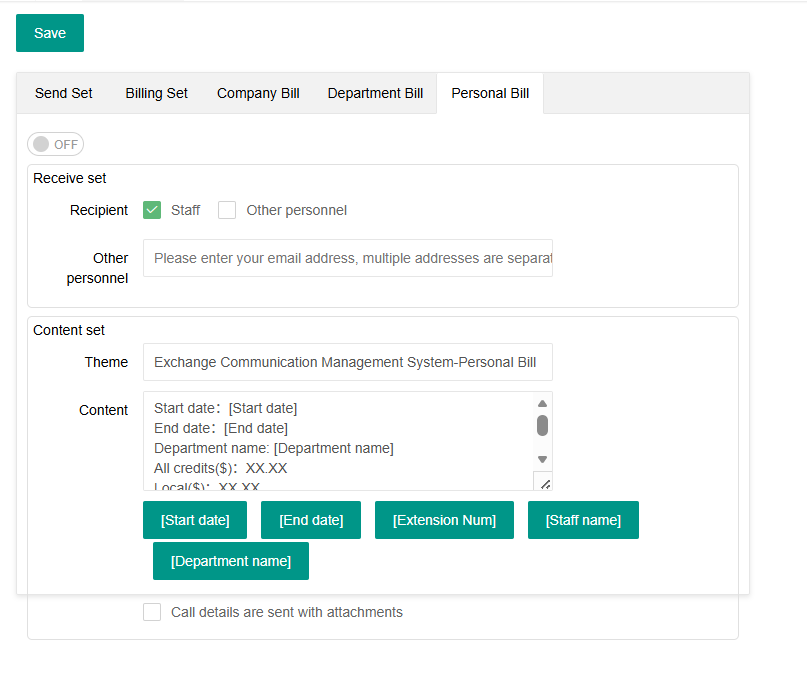
(3)Company Billing
To send company bills, check "Enable", set the object to introduce the bill, and add the personnel to receive the bill (Note: The personnel receiving the bill must fill in the email information);
Email content settings: You can freely set the content and whether to send the call details with the email
As shown in the following figure:
(4)Billing Department
Billing department settings refer to "Company Billing"
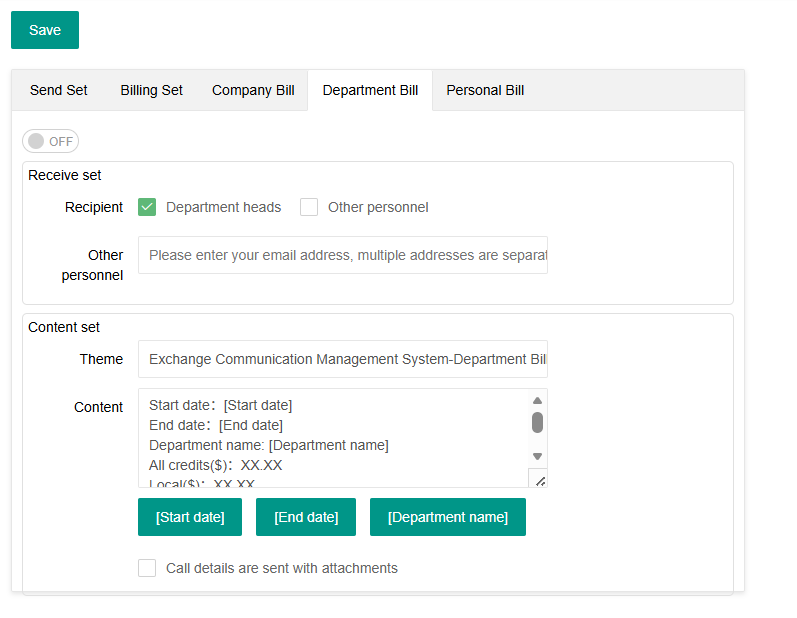
(5)Personal billing
Please refer to "Company Billing" for personal billing settings
3、Business Warning
Business alerts include call cost alerts, bill abnormality alerts, communication abnormality alerts, and phone theft alerts. For detailed settings, please refer to the billing statement - send settings
Please refer to the sending test in the billing function for sending settings testing
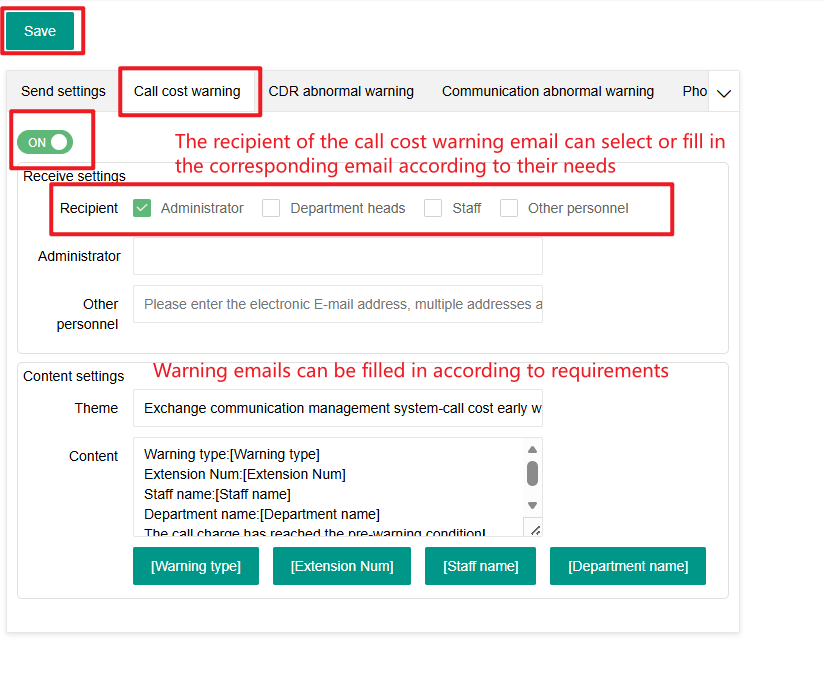
(1) Call cost warning
Call cost warning setting, when the cost of the phone reaches the set warning fee, an email reminder will be sent
If you need to use the call cost warning function
First check: 'Enable'
Set up the alert receiving email object and the corresponding email for receiving alerts
The content of the warning email can also be filled in according to the needs
For example, as shown in the following figure:
(2) Abnormal alert for bill of lading
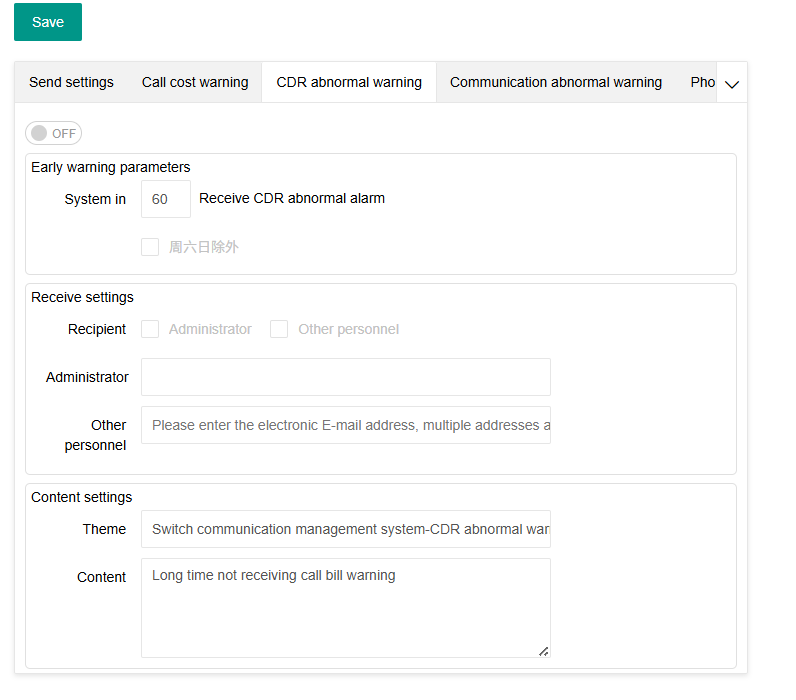
If the call ticket is not received for a long time, a warning email will be sent.
Need to click 'Enable'
Warning parameter: Set the corresponding time for not receiving the call ticket according to the requirements, and send a warning email
Recipient: Set up alert email recipients and corresponding email addresses according to requirements
Content setting: The program will send corresponding warning emails based on the warning situation, making it convenient for staff to know and handle the warning situation in a timely manner
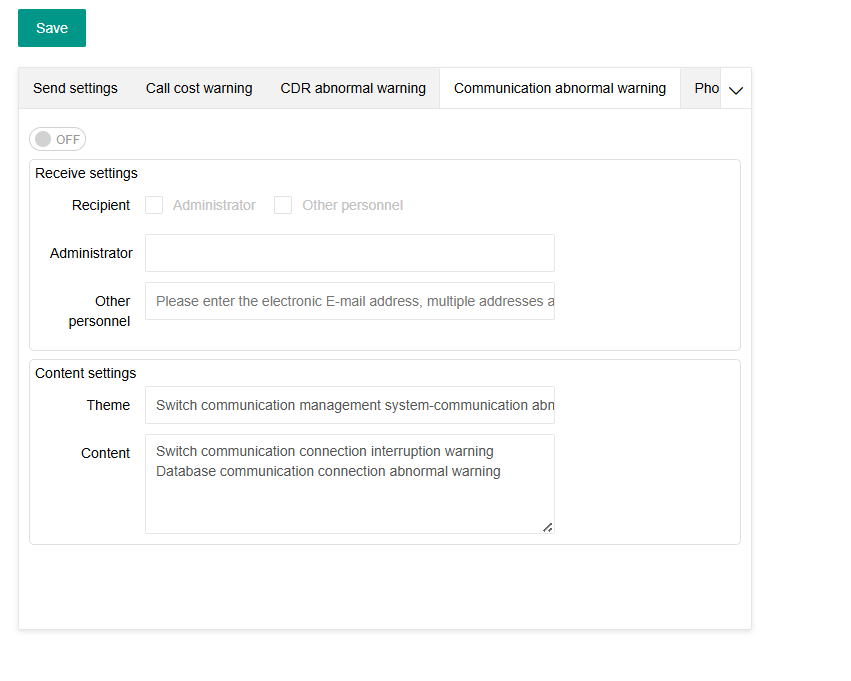
(3) Communication abnormality warning
Receiving abnormal alerts will send alert emails in the following abnormal situations
1) Communication connection interruption warning
2) Database insertion exception warning
Need to use the function of receiving abnormal alerts
Need to click 'Enable'
Warning parameter: Set the corresponding time for not receiving the call ticket according to the requirements, and send a warning email
Recipient: Set up alert email recipients and corresponding email addresses according to requirements
Content setting: The program will send corresponding warning emails based on two warning situations, making it convenient for staff to know which warning it is and handle it in a timely manner
For example, as shown in the following figure:
(4) Phone theft warning
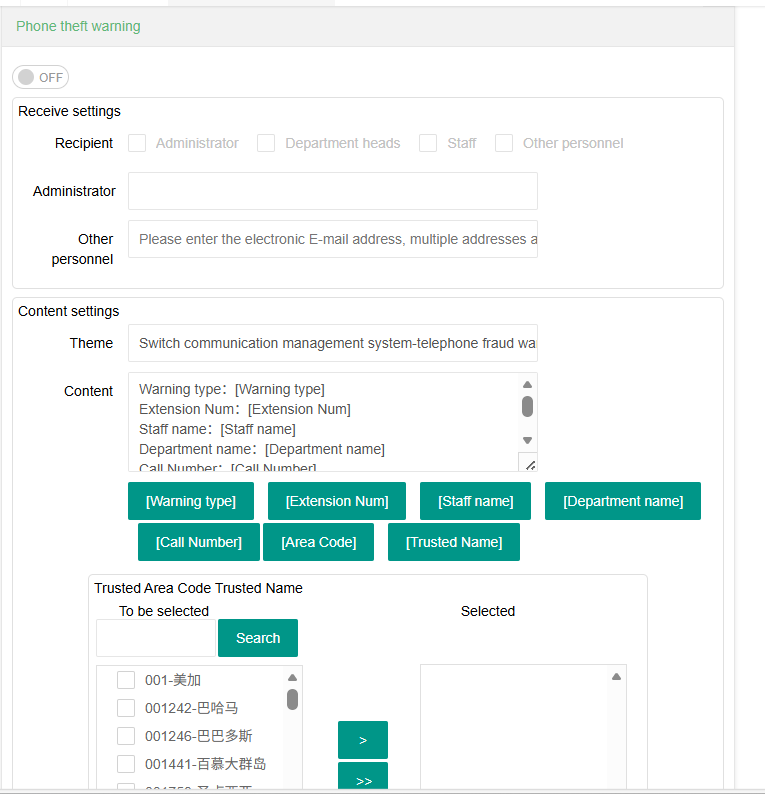
Phone theft warning setting, the system will send email reminders if there are call records from non designated countries that may have been hacked
If you need to use the call cost warning function
First check: 'Enable'
Reception settings: Set up the alert receiving email object and the corresponding email for receiving
Content setting: The content of the warning email can also be filled in according to needs
Trusted area code country name: Add a trusted area code. When the system displays call records for the country with that area code, no email reminder will be sent.
For example, as shown in the following figure:
六、System Settings
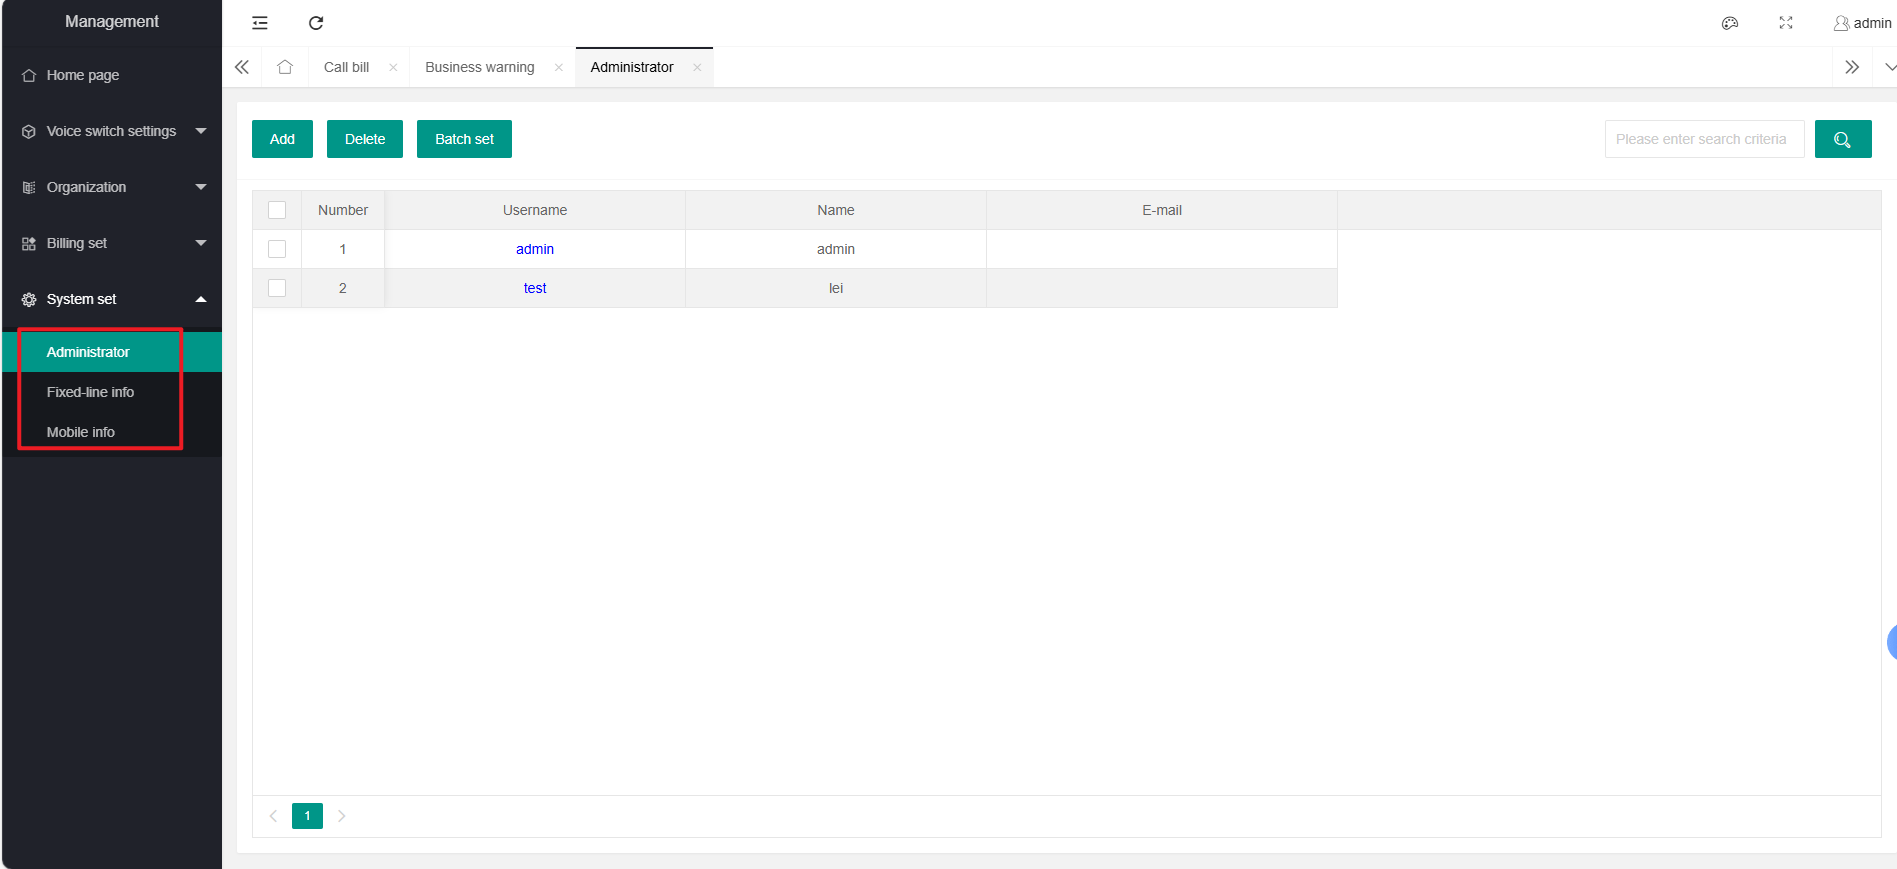
The system settings mainly have the following functions (as shown in the following figure)
1、Administrator Information
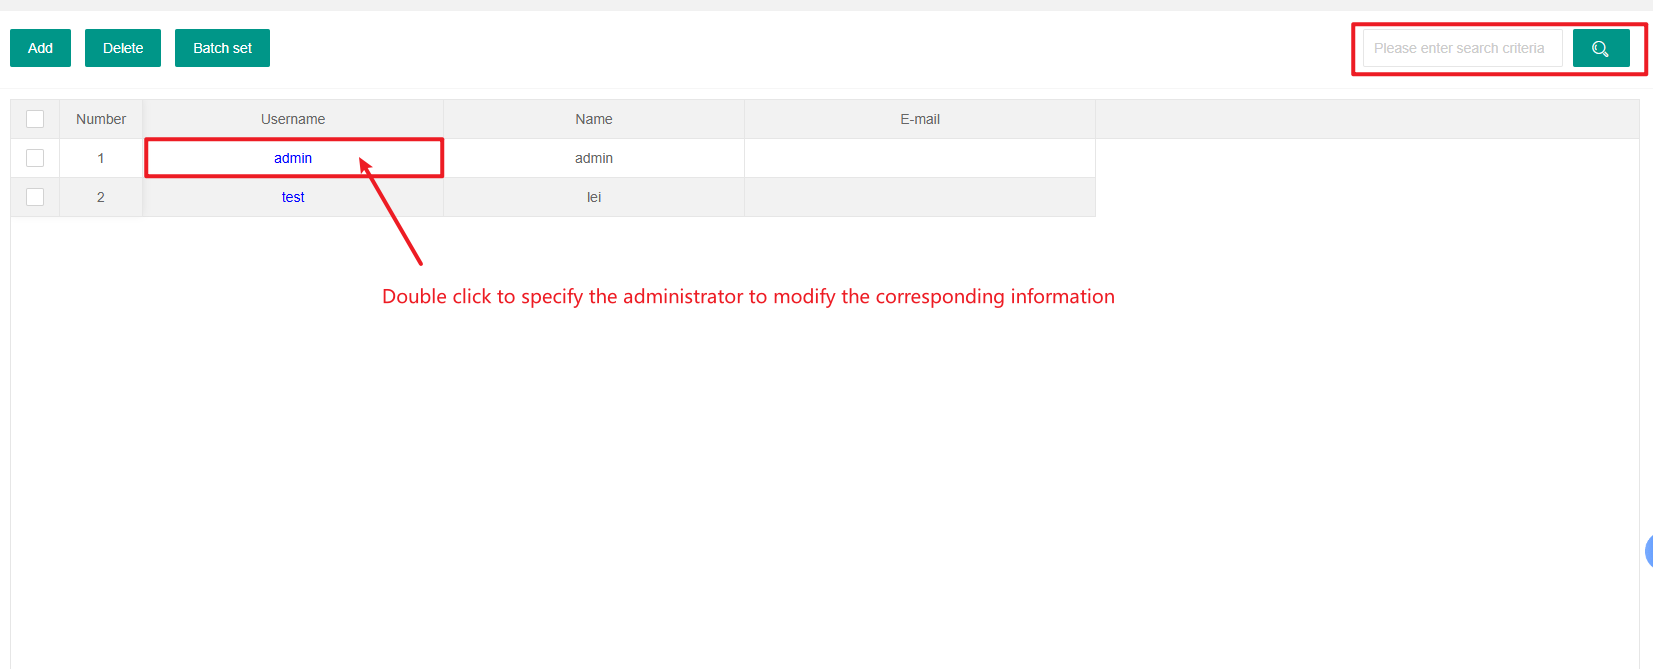
Administrator information functions include: adding administrators, deleting administrators, batch setting, and querying
(1)Add Administrator
It is recommended to fill in the email address; check the relevant functional permissions for the administrator; set up the employee information to be managed
After setting up, just save it
For example:
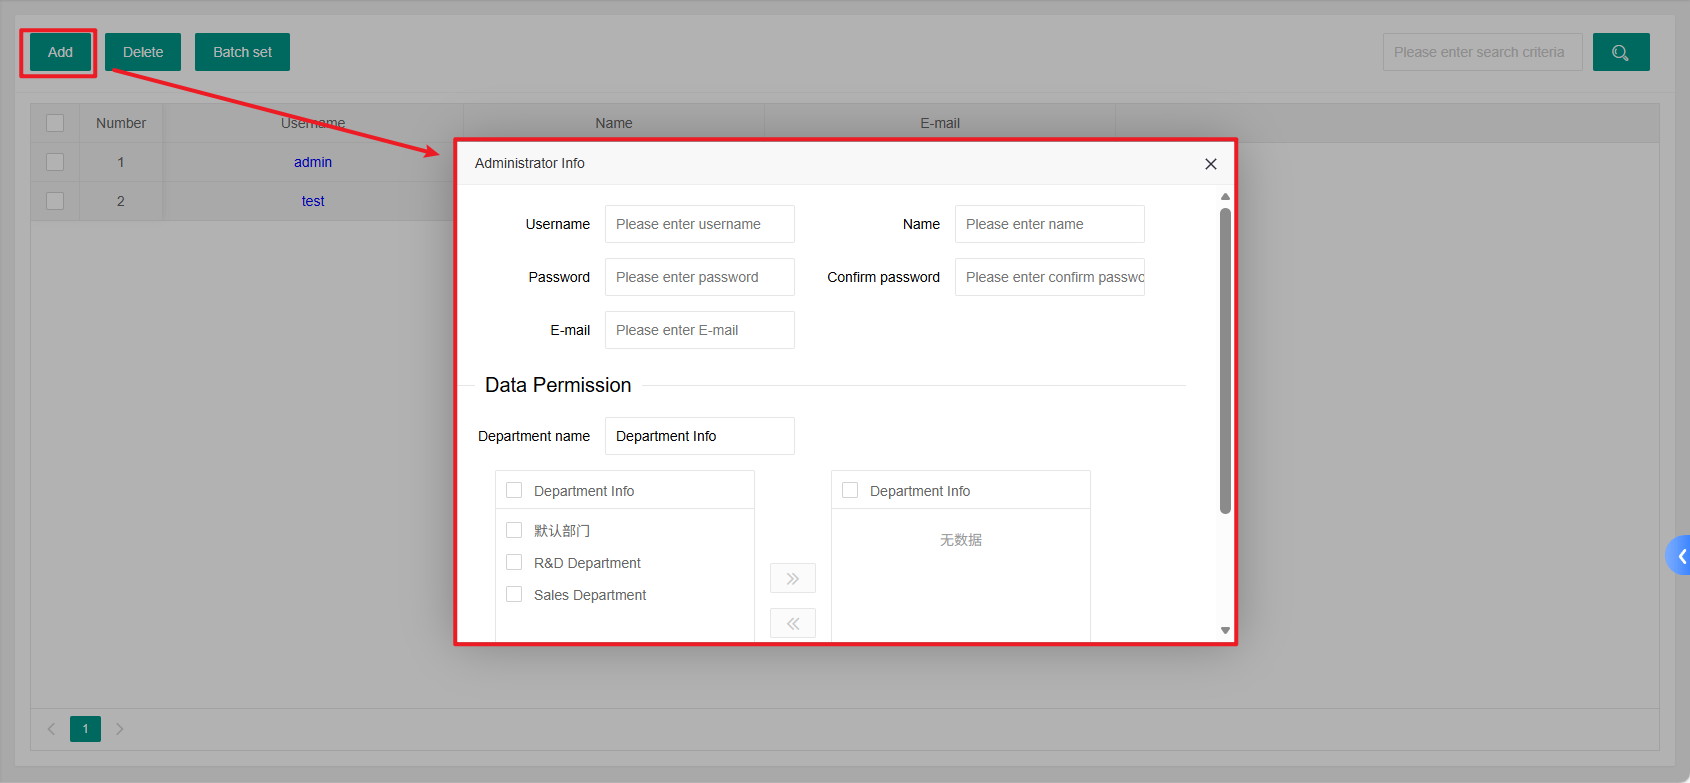
Attention: The administrator username cannot be created repeatedly;
Attention: The administrator can set different data permissions. When querying and counting call records, only the call records of the selected employees/call types will be displayed.
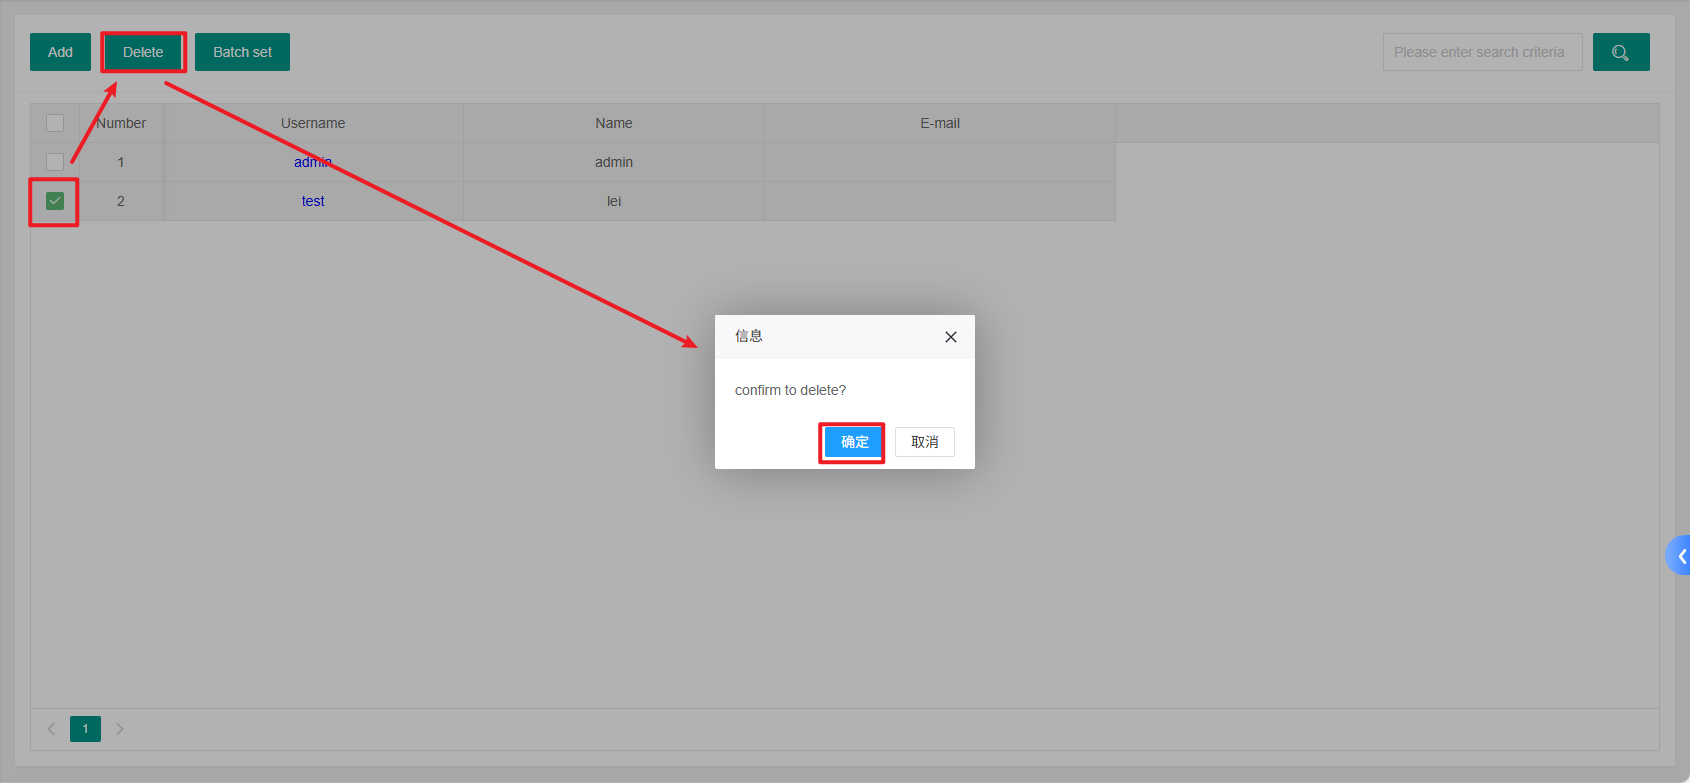
(2)Delete administrator
Select the administrator to be deleted and click "Delete"
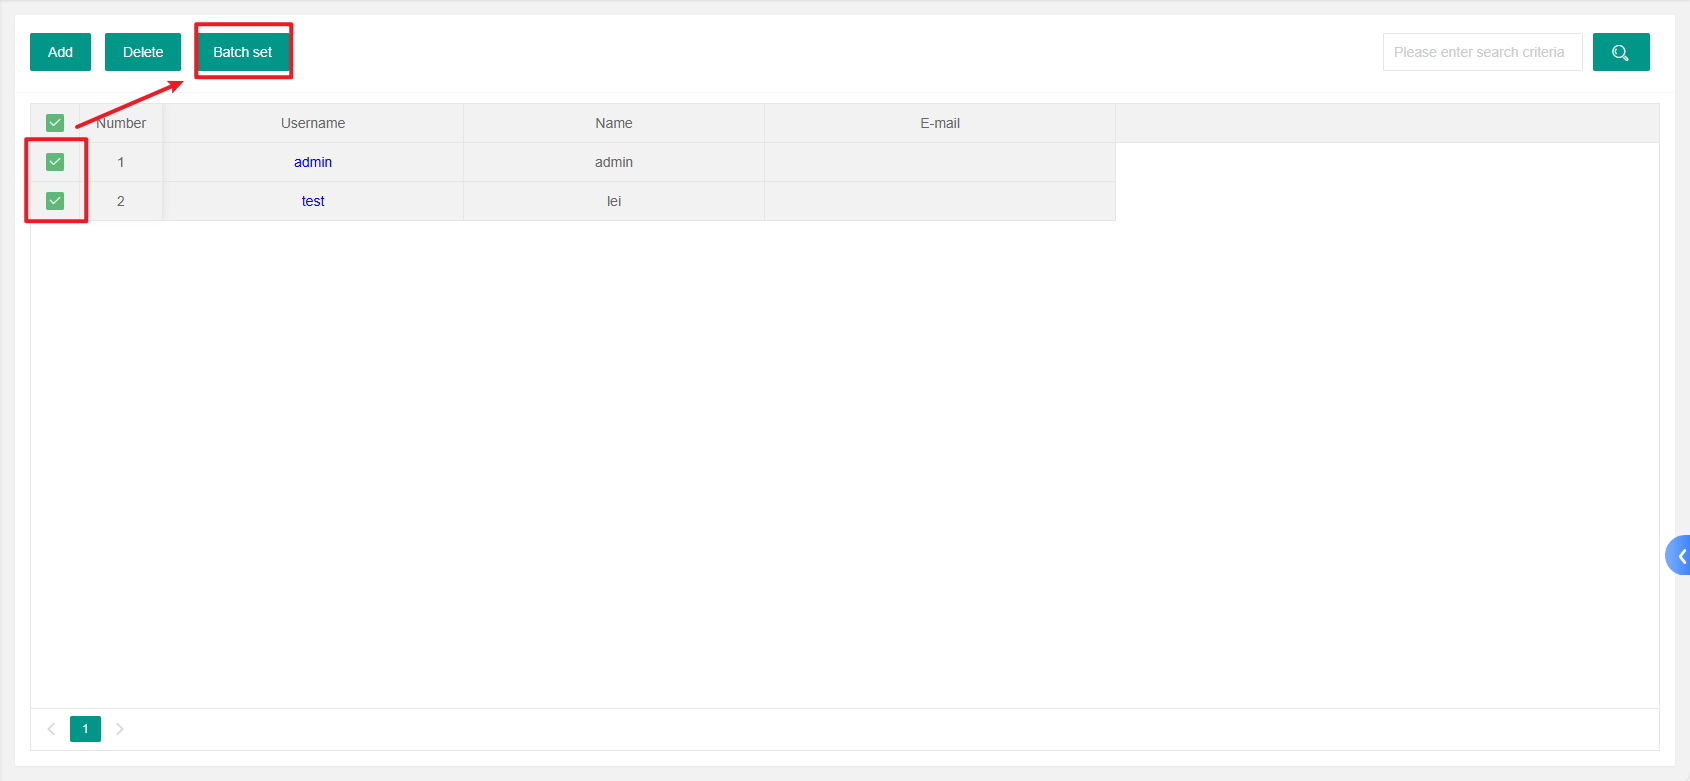
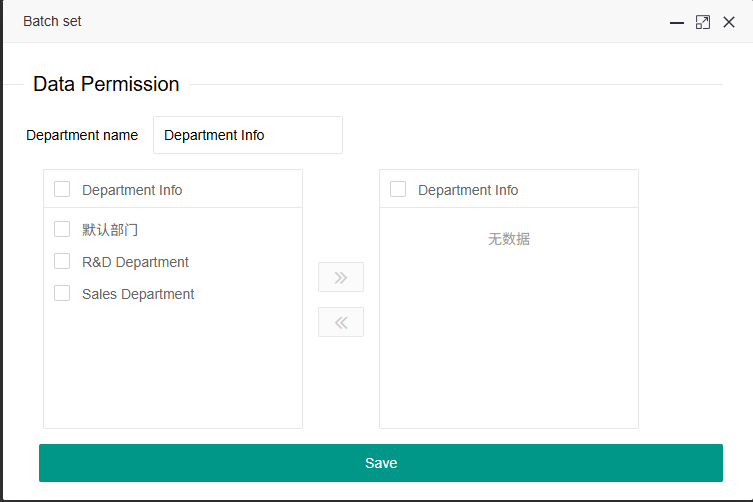
(3)Batch setting
Select the administrators to be set, and you can batch set the employees with data permissions. After setting, just save it.
For example:
(4)Query administrator
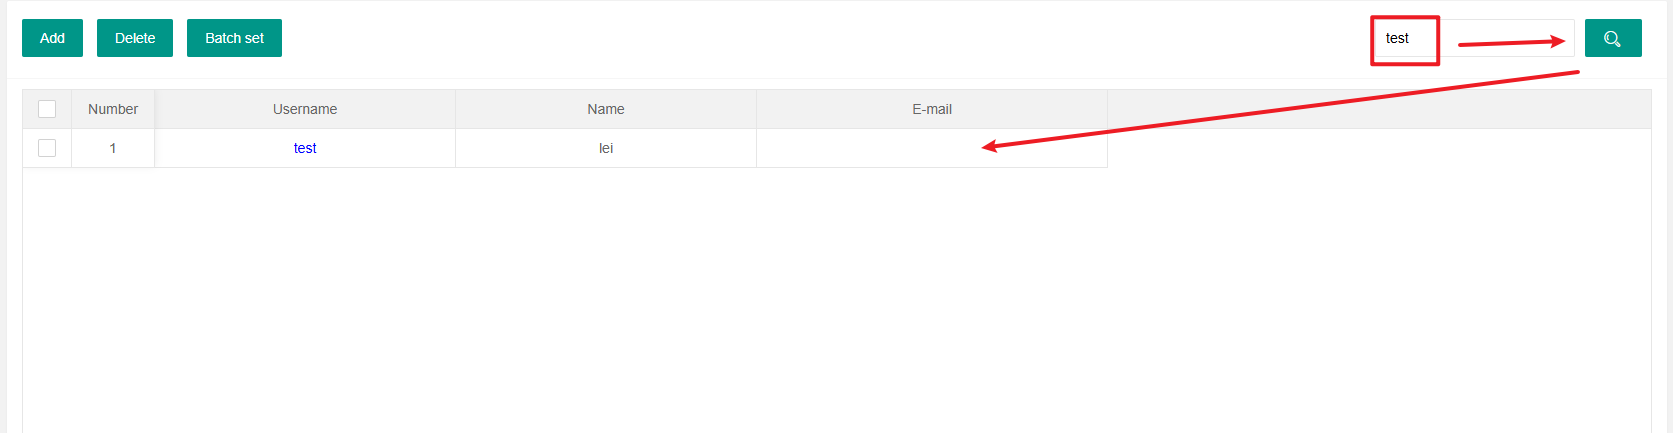
The query criteria can be: username or name
2、Fixed line information database
This module is intended for use by technicians, so it will not be explained here
3、Mobile Information Database
This module is intended for use by technicians, so it will not be explained here